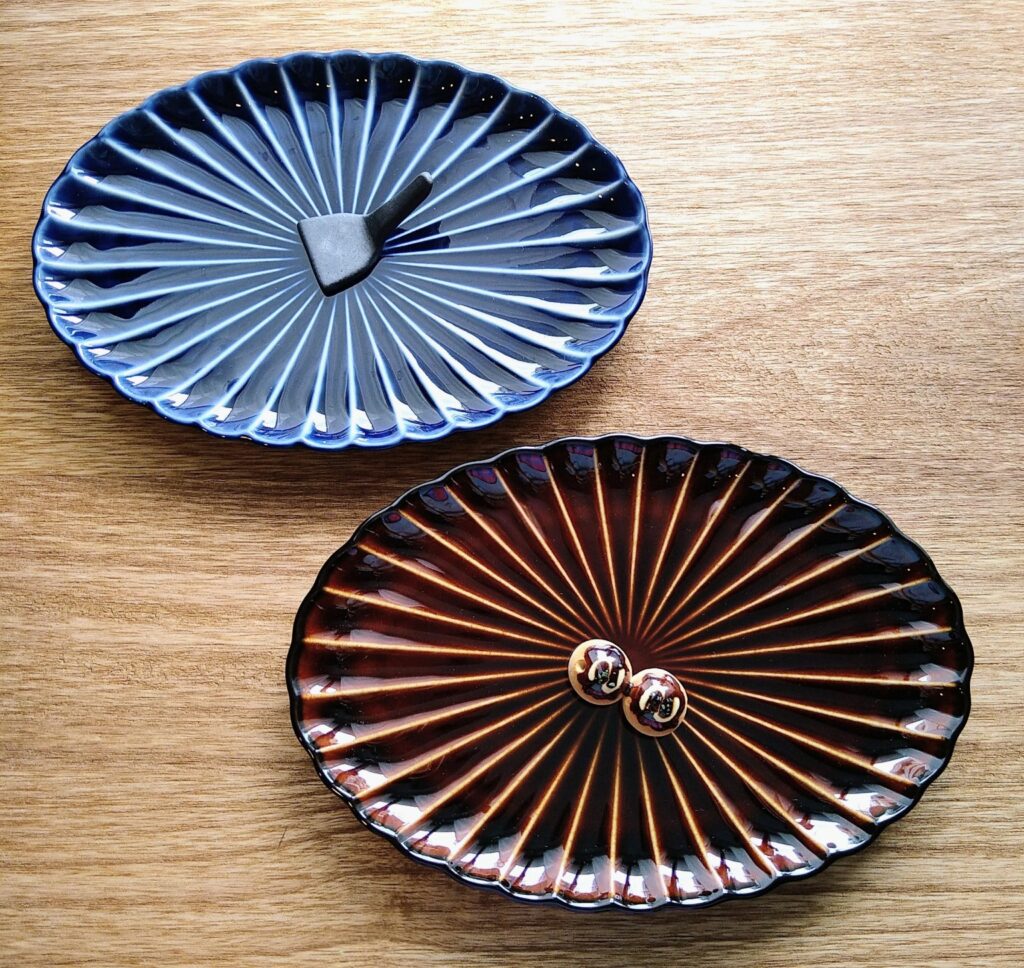
I bought two Giyaman plates — one deep indigo, one lacquer brown.
When I picked them up, they were lighter than I expected. But visually, they felt heavy somehow. Dignified. Serious. I felt like I shouldn’t pair them with unserious chopstick rests.
So I tried placing an okonomiyaki-spatula-shaped chopstick rest beside them. As expected, it couldn’t survive the atmosphere of the plate. A takoyaki-shaped one almost worked. I think it’s because the glossy brown surface and the color of takoyaki sauce somehow matched.
The blue one is unforgiving. The brown one is more forgiving — it accepts a certain amount of nonsense.
That said, why do these plates make food look so good?
Standing before these serious plates, I find myself thinking seriously too.
“Giyaman” is an old Japanese word for glassware, believed to derive from the Portuguese word diamante (diamond). After the Meiji era (1868–1912), it gradually fell out of use and was replaced by the word “glass.”
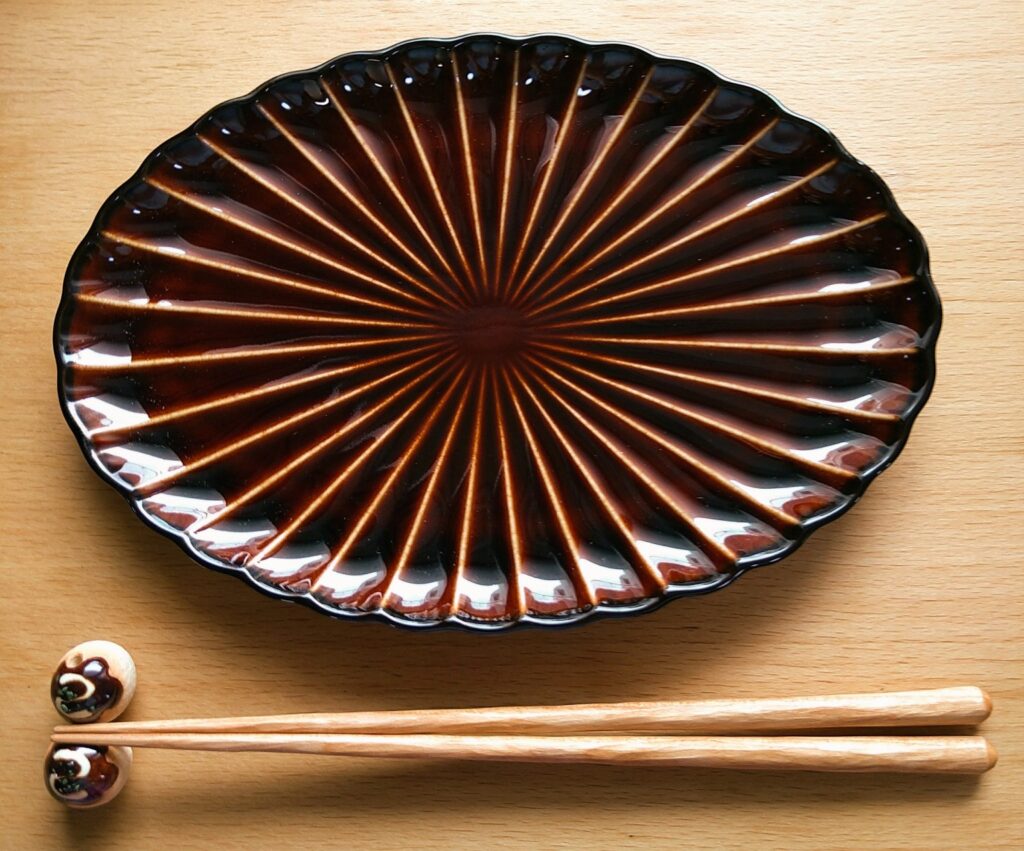
Kaneko Kohyo’s Giyaman-tou is made of porcelain, but it has the translucency of glass and the deep luster of lacquerware. When you see it in person, the old word “Giyaman” fits perfectly.
The plate has ridges radiating outward from the center, naturally drawing the eye inward. It’s a design that puts the food front and center.
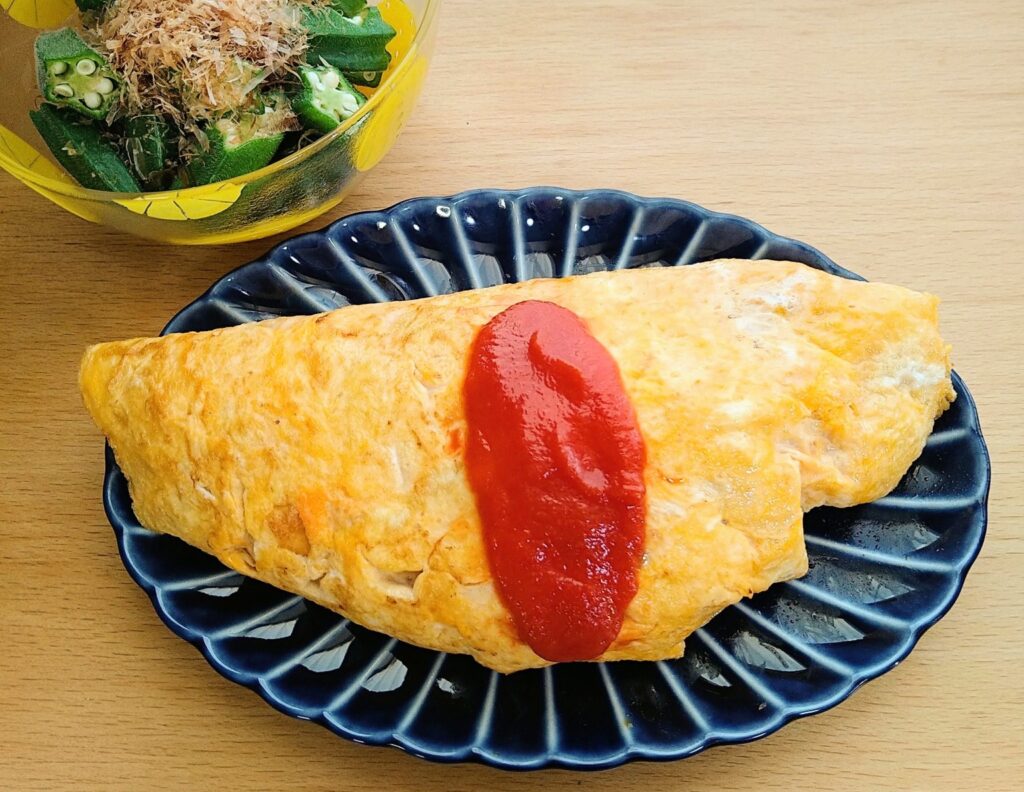
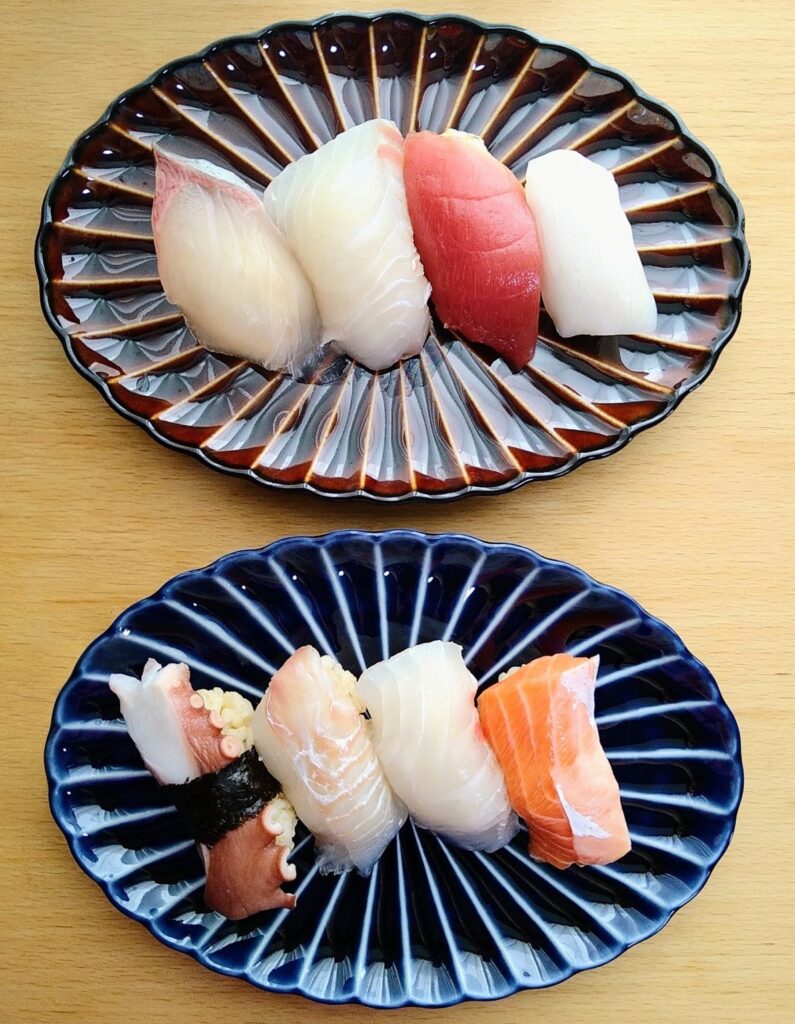
The series comes in four colors: Nasu-kon (eggplant blue), Urushi Brown, Sumi Black, and Rikyu Green — each named after traditional Japanese colors and materials. I have two: Nasu-kon and Urushi Brown.
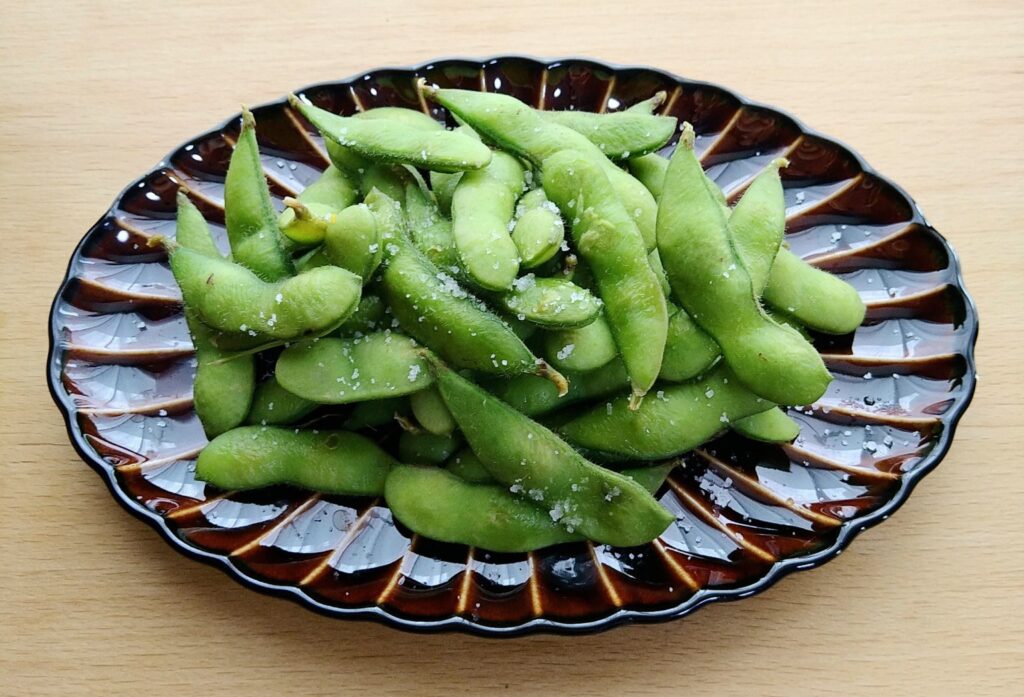
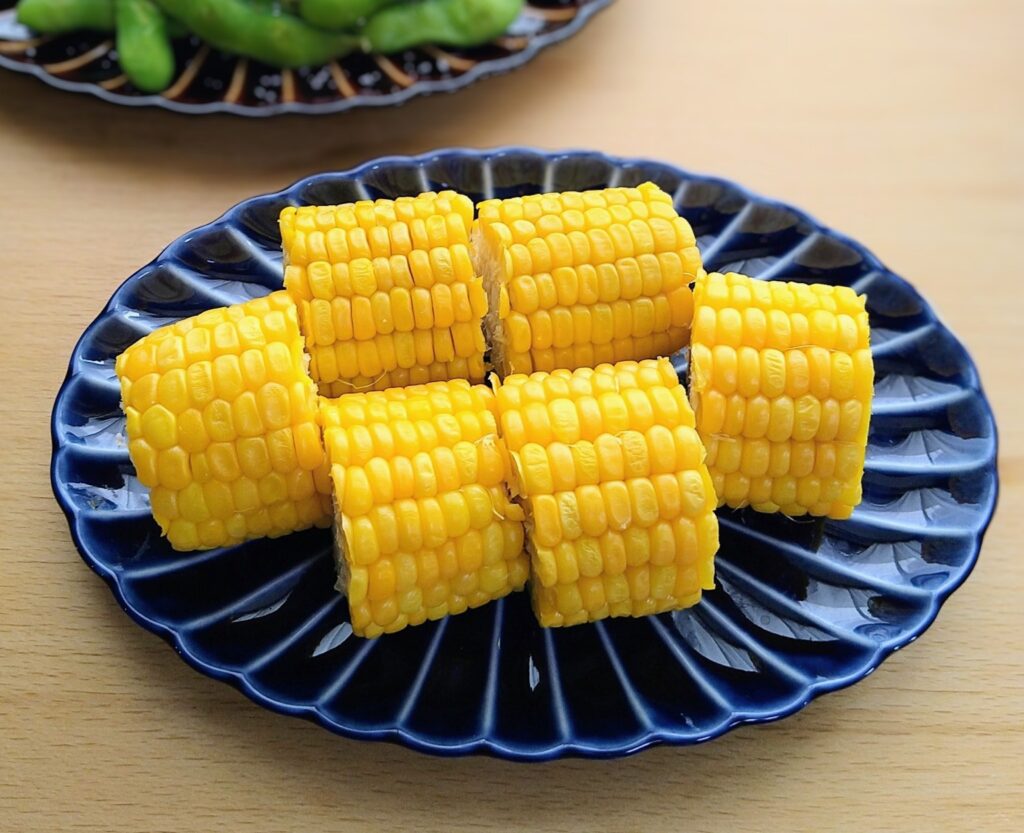
Both colors make ordinary meals look more appetizing. That much is consistent.
Nasu-kon makes food look fresher and more vibrant. Urushi Brown makes it look richer and more flavorful.
Supermarket Sushi on Giyaman
Hamburg Steak on Giyaman
It’s also practical. The glaze doesn’t stain easily, and it’s safe in the microwave for reheating. It’s light enough for everyday use.
This series took years of trial and error to complete. The glaze used was so notoriously difficult to work with that potters used to say it would ruin a kiln. The result was Giyaman-tou. Since its release in 2008, the series has found admirers around the world.
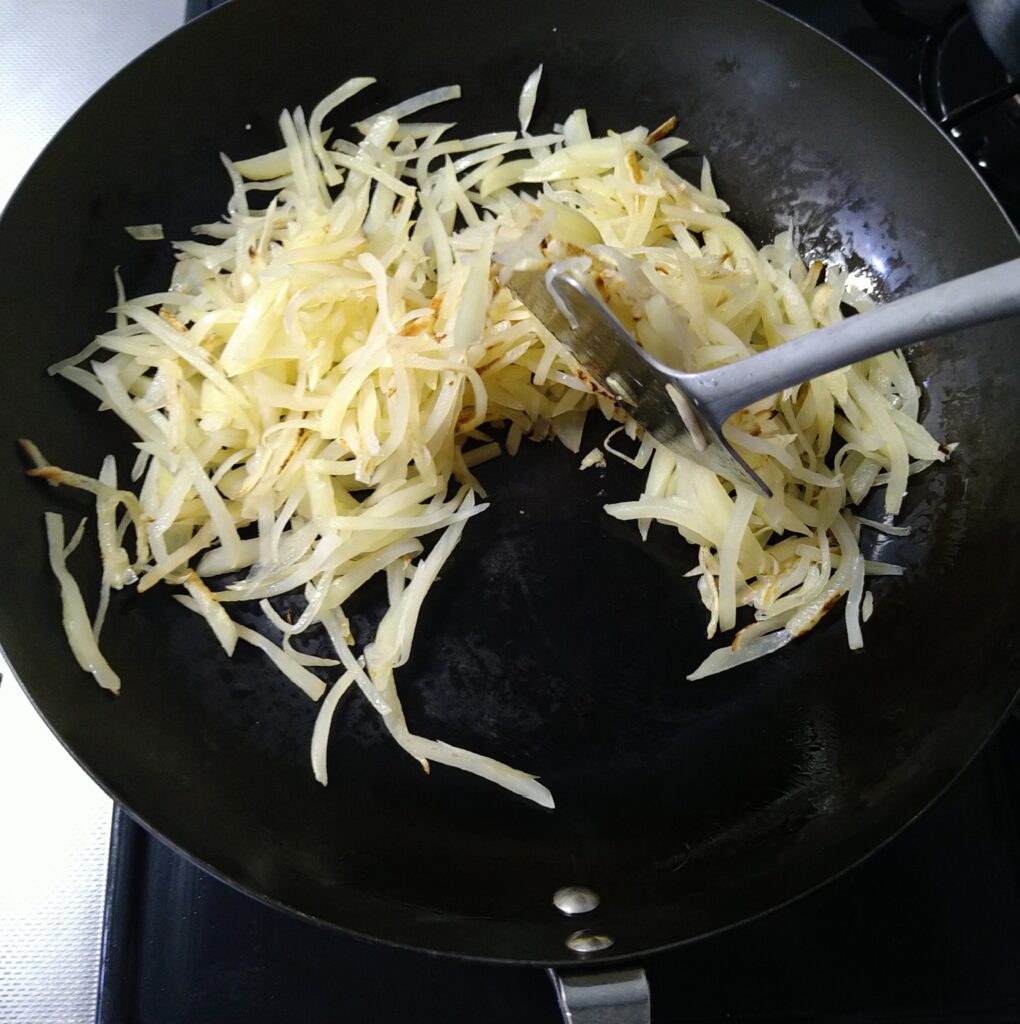
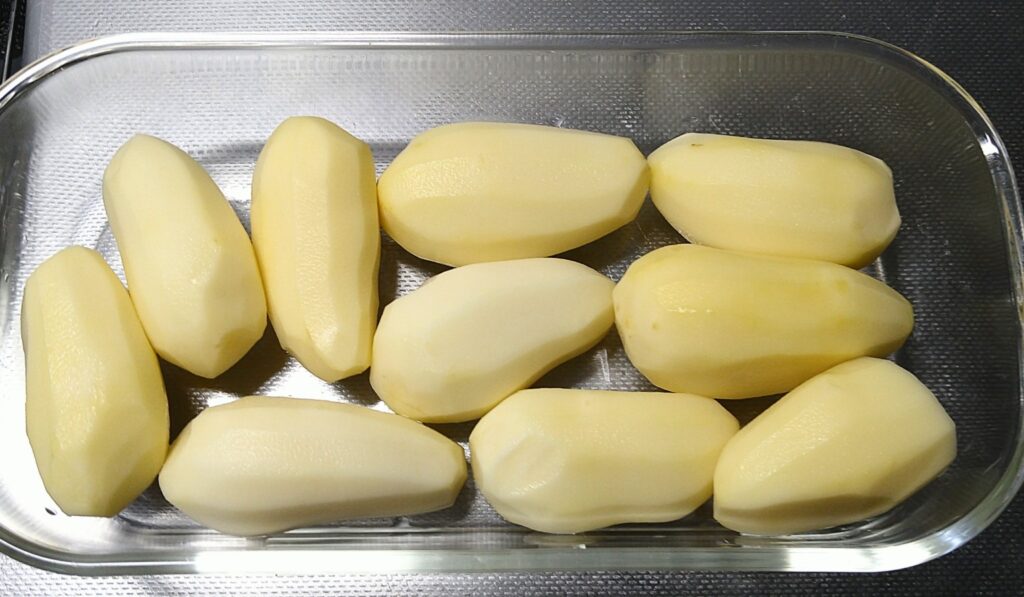
I was worried the potato galette would stick to the iron pan.
It didn’t. It fell apart instead.
I cut the potatoes into thin strips, salted them, and squeezed out the moisture. No soaking in water — I didn’t want the starch to wash away. I’d read that the starch alone would hold everything together without adding potato starch.
I preheated the pan as usual, added oil, and spread the potatoes out into a round shape. Covered it and let it steam. When the potatoes looked translucent, I slid a spatula underneath.
Almost no resistance.
The potatoes hadn’t stuck to the pan. They also hadn’t stuck to each other.
Everything was falling apart.
For the second attempt, I microwaved the potatoes first. My theory was that gelatinizing the starch would help them bind together. The potatoes felt stickier than before. Maybe this would work.
Same result.
Falling apart. It looked like a bean sprout stir-fry.
Analysis
The problem may have been the potato variety. I used waxy potatoes, which are lower in starch and don’t bind as well. They may simply not be the best choice for galette.
I also wonder whether adding some grated potato would have acted as a natural glue.
Another possibility is that I simply didn’t press the potatoes together firmly enough while cooking.
I ran out of potatoes before I could test any of these theories.
After
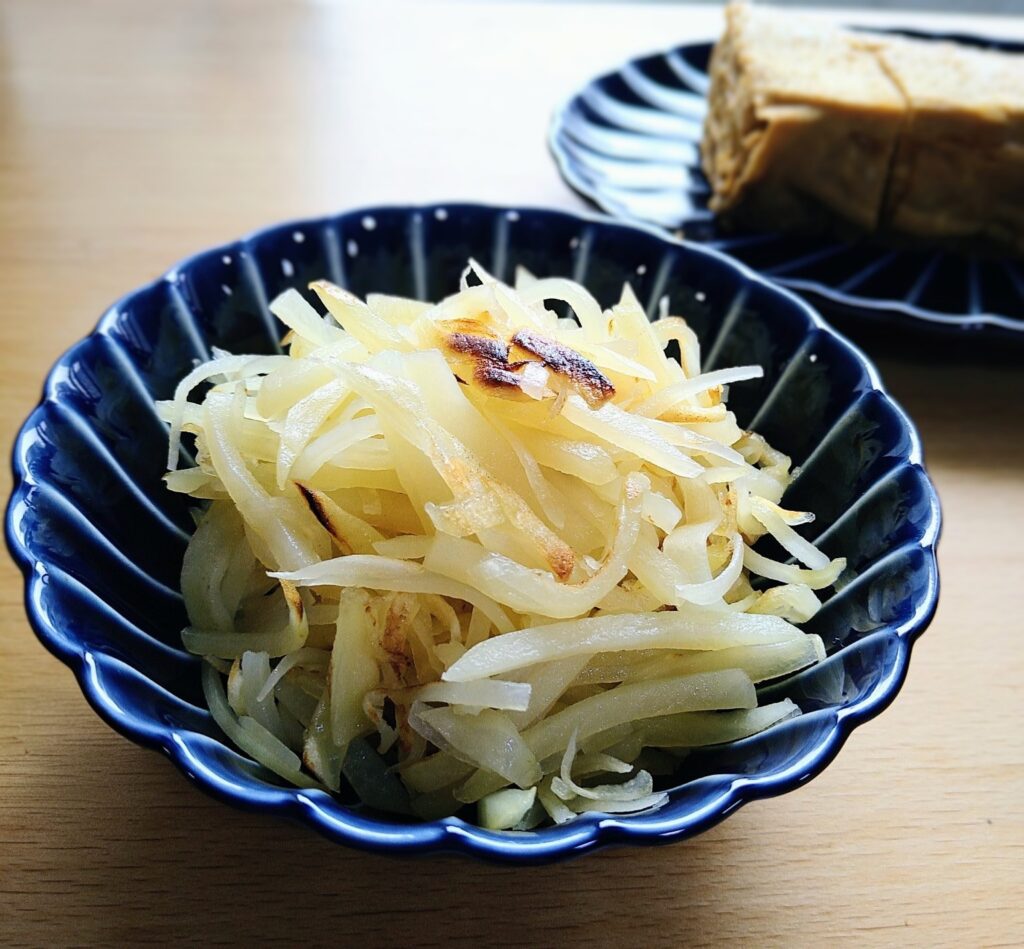
I plated the collapsed potatoes on two dishes — a plain white plate and a Giyaman plate.
On the white plate, they still looked like failed potatoes. On the Giyaman plate, they somehow came back to life.
Same food. Different plate.
Conclusion
I tried to make a potato galette in an iron pan. It didn’t stick to the pan. The potatoes didn’t stick to each other either.
Without meaning to, I ended up proving that Giyaman makes food look better.
Next time, I’d like to make a proper round galette. One that doesn’t need the plate to save it.
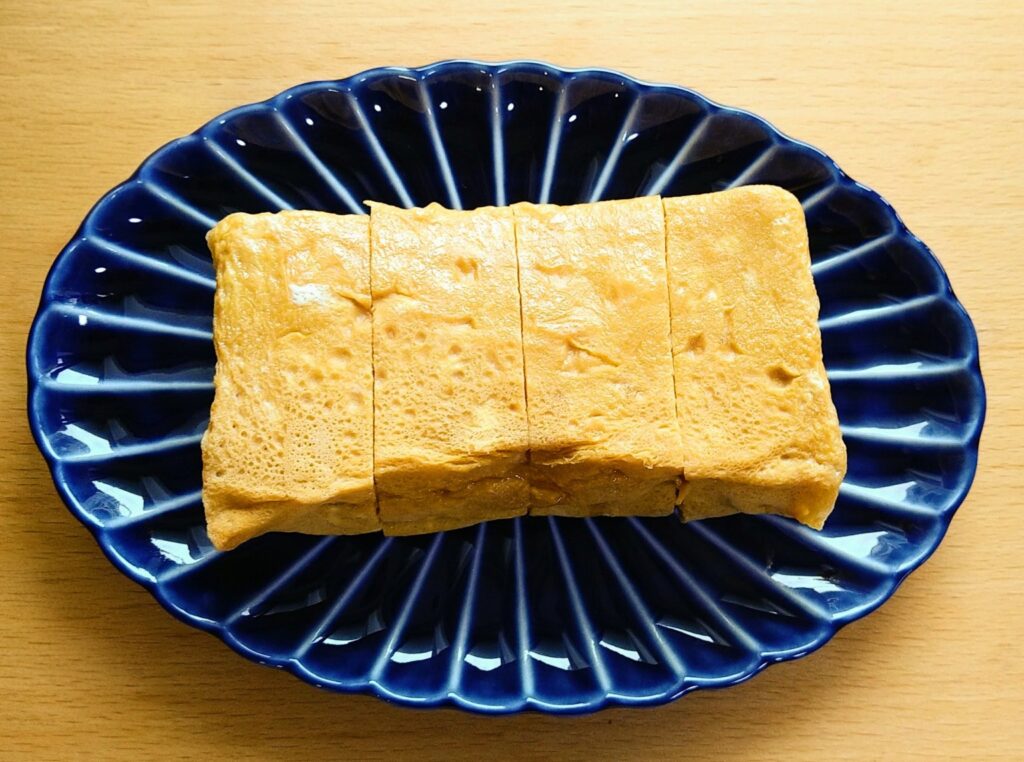
The tamagoyaki and Giyaman behind the potato stir-fry.
Takoyaki (たこ焼き) are round, savory balls made from a wheat-based batter filled with diced octopus, cooked in a special pan with round molds. They are typically topped with takoyaki sauce, mayonnaise, bonito flakes, and dried seaweed.
Originally from Osaka, takoyaki are one of Japan’s most iconic street foods.
A Brief History
The history of takoyaki cannot be told without two predecessor dishes. Rajioyaki was a popular Osaka street food since the Meiji era — a round, grilled dumpling filled with beef tendon and konjac. Akashiyaki, on the other hand, has existed since the Edo period. It uses octopus as a filling and is served dipped in dashi broth, with a soft, fluffy texture.
In 1935, Tomekichi Endo, the founder of Aizuya in Osaka, heard that octopus was used in Akashiyaki. He swapped the filling in his rajioyaki for octopus — and takoyaki was born.
After World War II, the introduction of Worcestershire sauce led to the now-familiar style of serving takoyaki with sauce and toppings, and its popularity exploded. Today, it is said that almost every household in Osaka owns a takoyaki maker.
Eating Out vs Making at Home
Eating Out
At a street stall or restaurant, takoyaki is a quick and satisfying snack you can enjoy on the go. The portions tend to be generous, and the texture is what makes it special — crispy on the outside, soft and gooey on the inside. Each shop has its own take on the batter, sauce, and toppings, which makes trying different places part of the fun.
Making at Home
At home, the fun is different. Everyone gathers around the table, takes turns filling the molds, and watches the takoyaki take shape together. You can also get creative with fillings — mochi, cheese, sausage, edamame, even chocolate. It turns into a bit of a guessing game — you never quite know what you’re going to get.
Making Takoyaki at Home
The Batter
You can use a ready-made takoyaki flour mix, which already has seasoning — simple and convenient.
To make it from scratch, combine flour, eggs, dashi (or water), and a pinch of salt and soy sauce (or Japanese dashi stock powder). Adding grated or powdered nagaimo (Japanese mountain yam) gives the batter a soft, fluffy, mochi-like texture. Mix well to avoid lumps — a whisk helps. If you have time, resting the batter in the fridge makes it even smoother.
As a rough guide: 100g of flour to 300–400ml of liquid. More water makes the batter softer and more fluid, but harder to flip — starting with 300ml is easier for beginners.
Basic Recipe
Flour: 200g
Eggs: 3
dashi (or water): 600–800ml
Salt: a pinch and soy sauce: 1/2 tbsp (or dashi powder: 1 tbsp)
Note: Some dashi powders contain salt. Adjust the seasoning to taste. Since sauce is added later, keep it light.
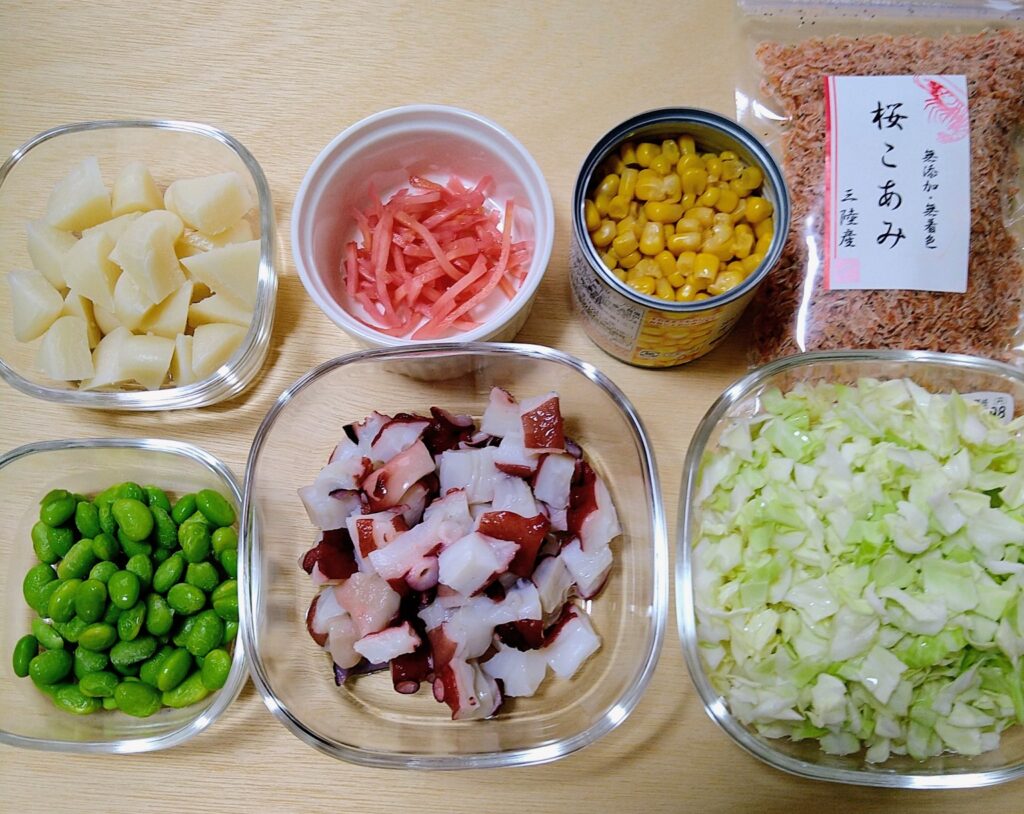
Fillings
Mochi, pickled ginger, corn, dried shrimp, edamame, octopus, and cabbage.
Octopus is the classic filling, but you can use almost anything — mochi, cheese, sausage, edamame, corn, shrimp, and more. Tenkasu (tempura scraps), pickled ginger, and green onion are optional but traditional.
Cooking
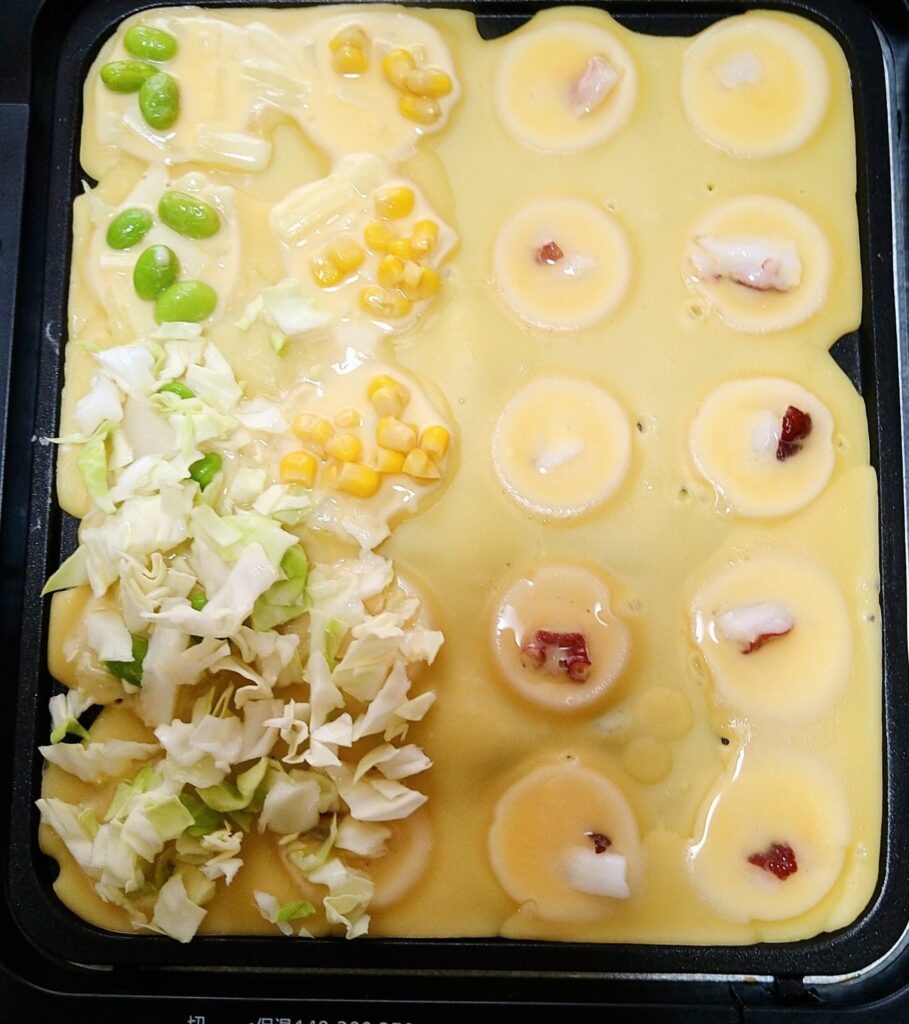
I probably could have added a little more batter and filling.
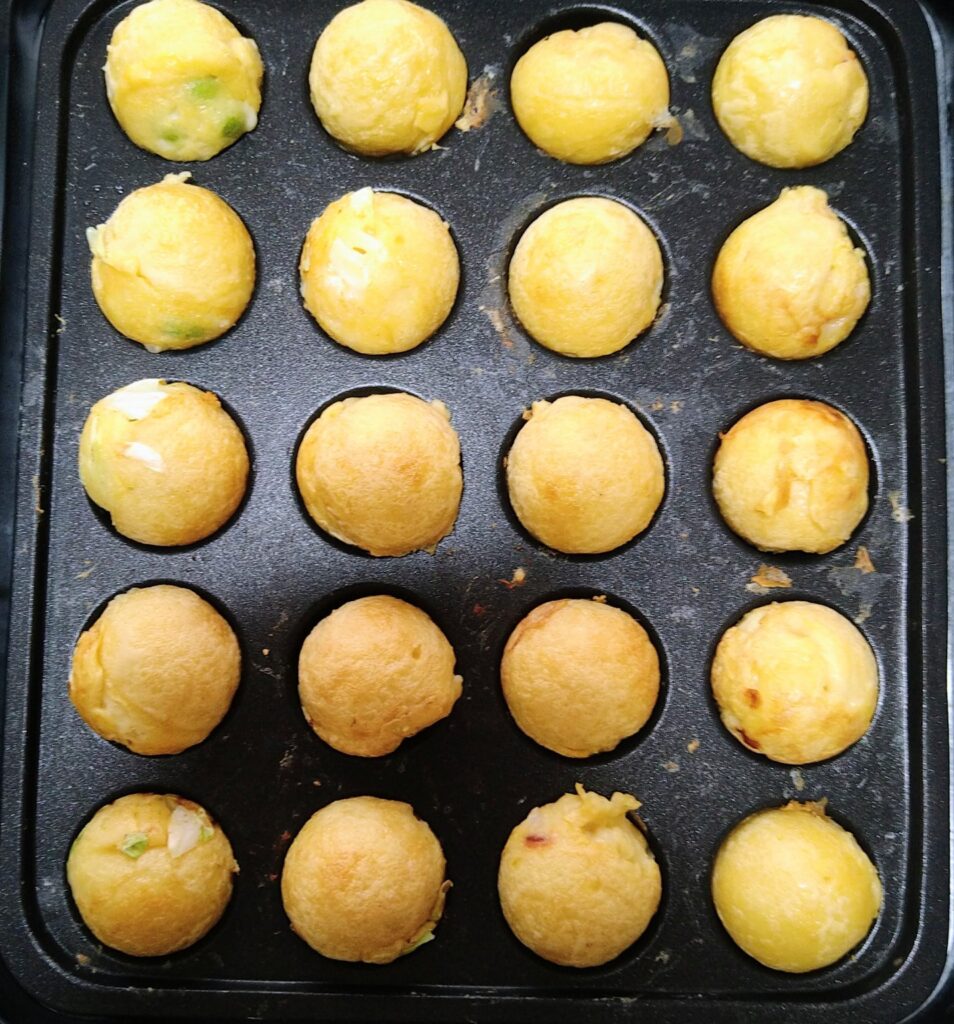
Pour the batter into the molds generously — enough to overflow and connect across the whole plate. Add your fillings into each hole. Use a bamboo skewer to score around the edges and fold the batter inward to form a round shape. Less batter results in a half-sphere rather than a full ball. More oil makes the outside crispier.
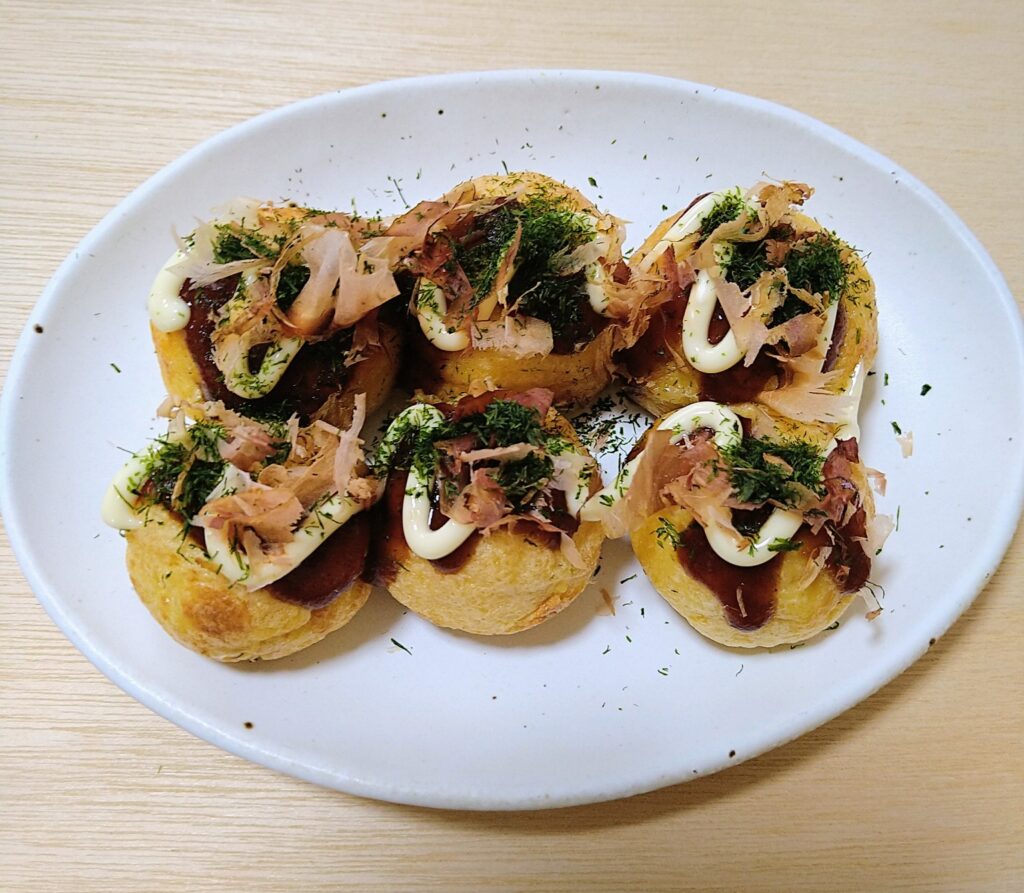
Cook until golden brown, then top with takoyaki sauce, mayonnaise, bonito flakes, and dried seaweed.
Even so, they turned out nicely round.
What You Need
To make takoyaki at home, you’ll need a takoyaki pan. There are two main options:
A stovetop pan like the Ikenaga Tekko cast iron takoyaki plate works on gas, electric, and IH cooktops. The cast iron retains heat well, helping achieve a crispy outside and a soft, fluffy inside. → Ikenaga Tekko Takoyaki Plate on Amazon
If you want the full experience of gathering around the table together, the Iwatani cassette gas takoyaki maker is a good option. It sits on the table and uses a portable gas canister — perfect for a takoyaki party. → Iwatani Takoyaki Maker on Amazon
You’ll also need bamboo skewers or picks for flipping, and something to oil the molds — like an oil brush or a paper towel.
Closing
Takoyaki is simple enough to make at home, but fun enough to turn into an event. Whether you’re trying it for the first time or bringing a taste of Osaka to your table, it’s worth making at least once.
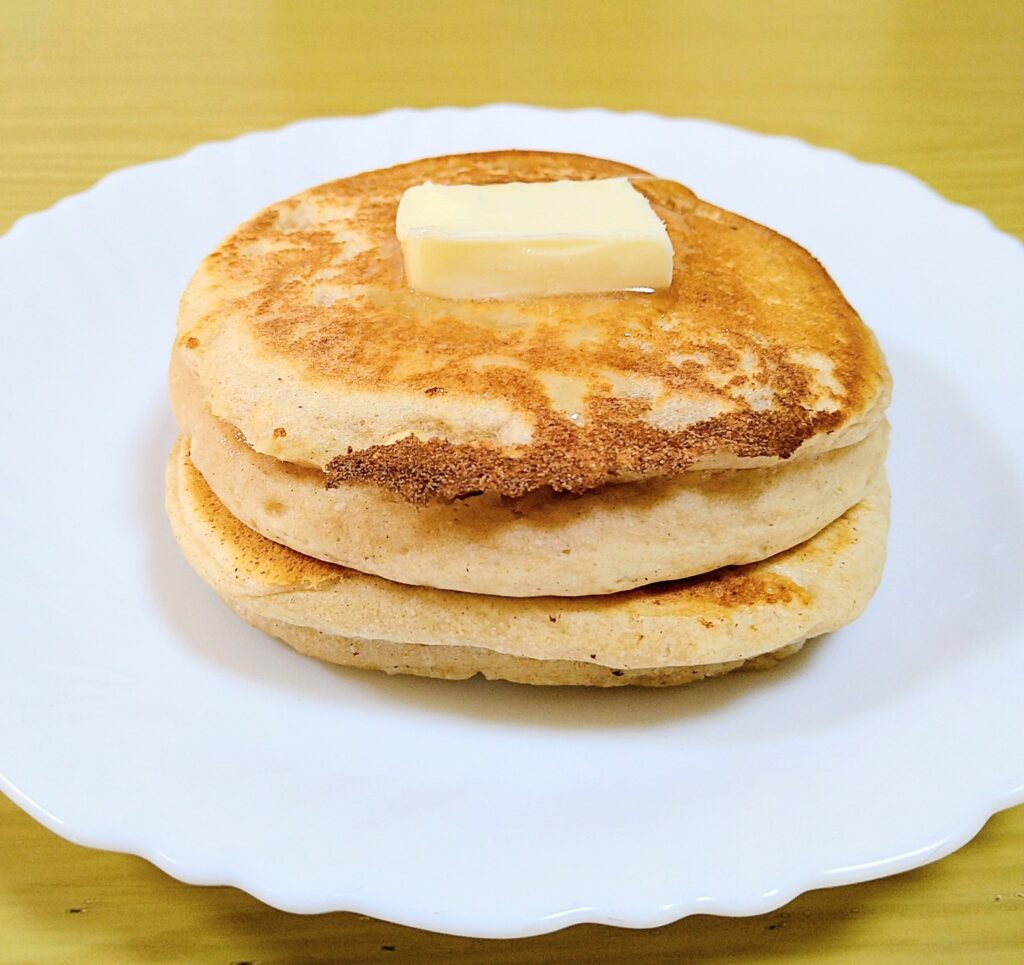
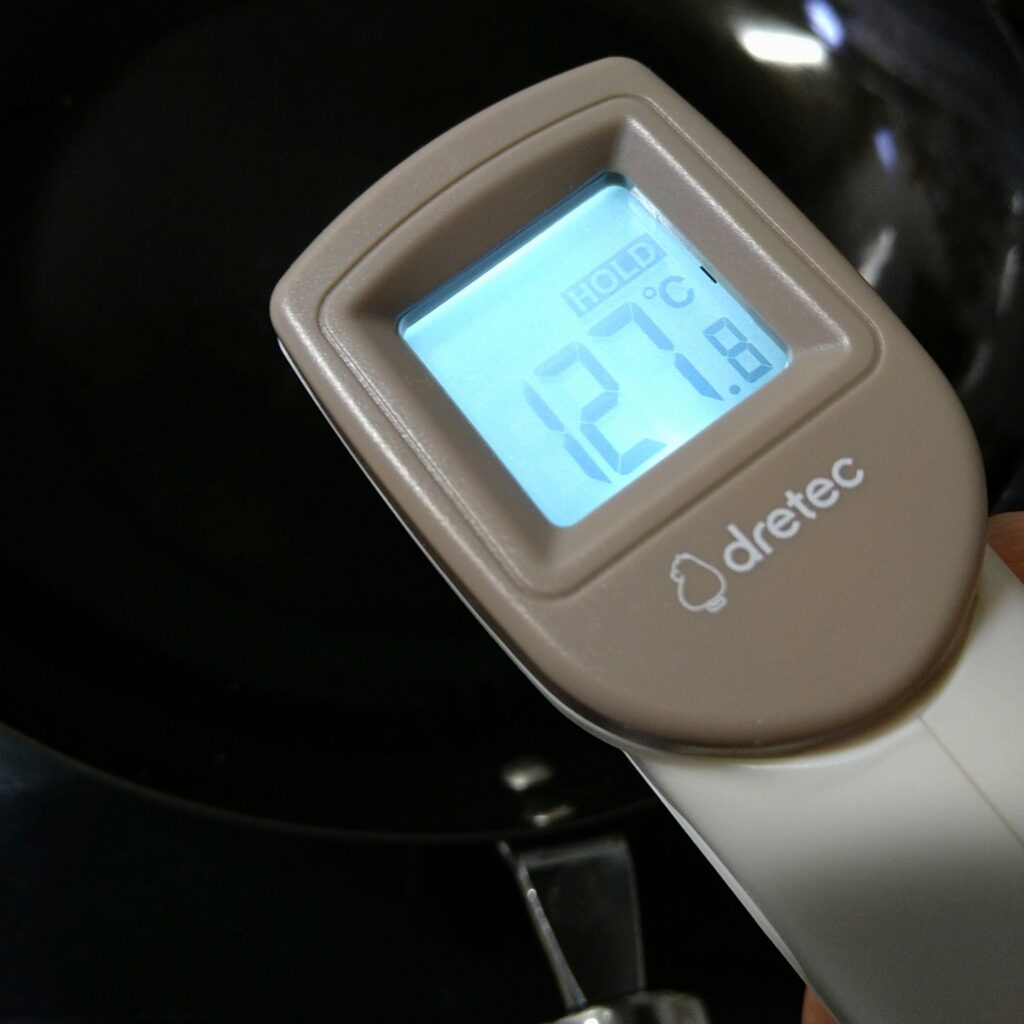
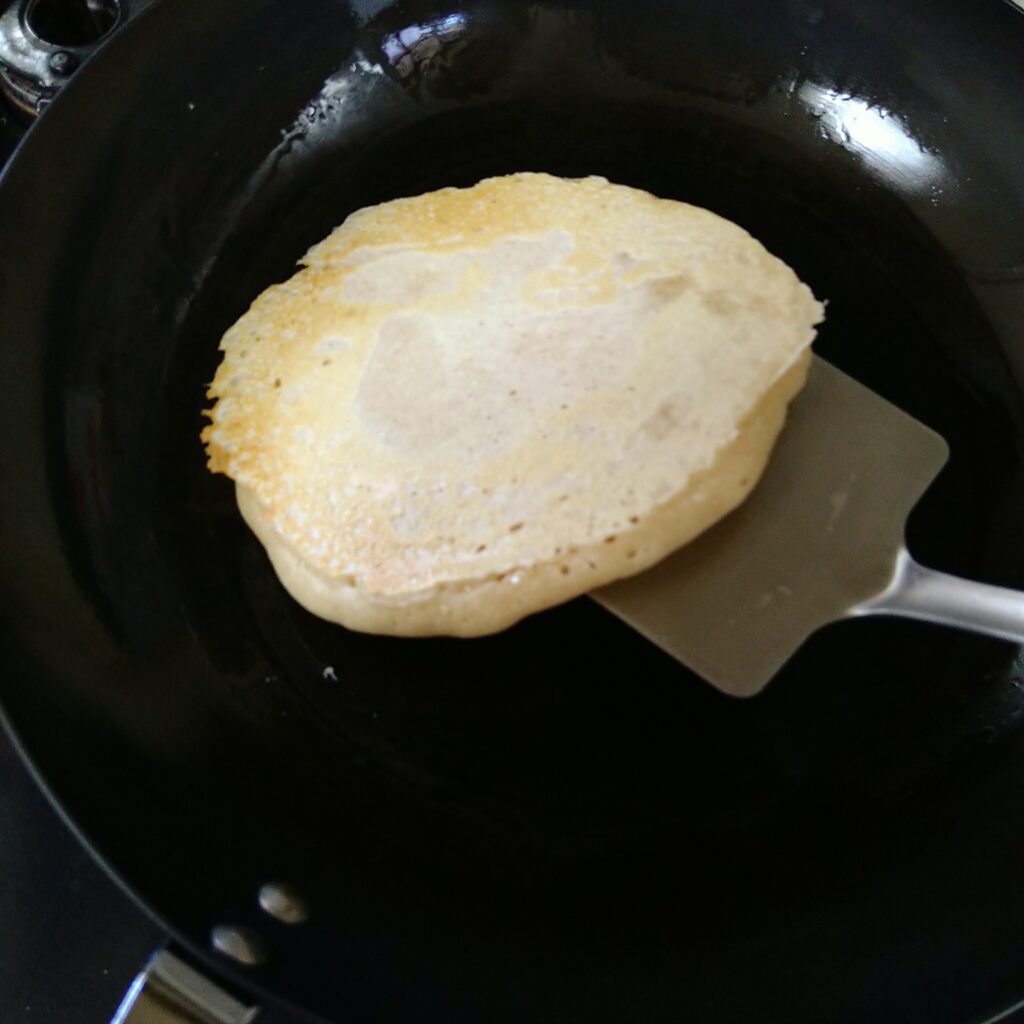
I thought pancakes would be difficult in cast iron. They weren’t.
They may stick at first, or simply not be set enough to lift — either way, once the surface firms up, they release with light pressure. Even if the center is slightly stuck, any turner — wood, silicone, or stainless steel — can get under it without much force. For cast iron, pancakes are surprisingly easy to work with.
How to Make It
No sugar on the left. Sugar on the right.
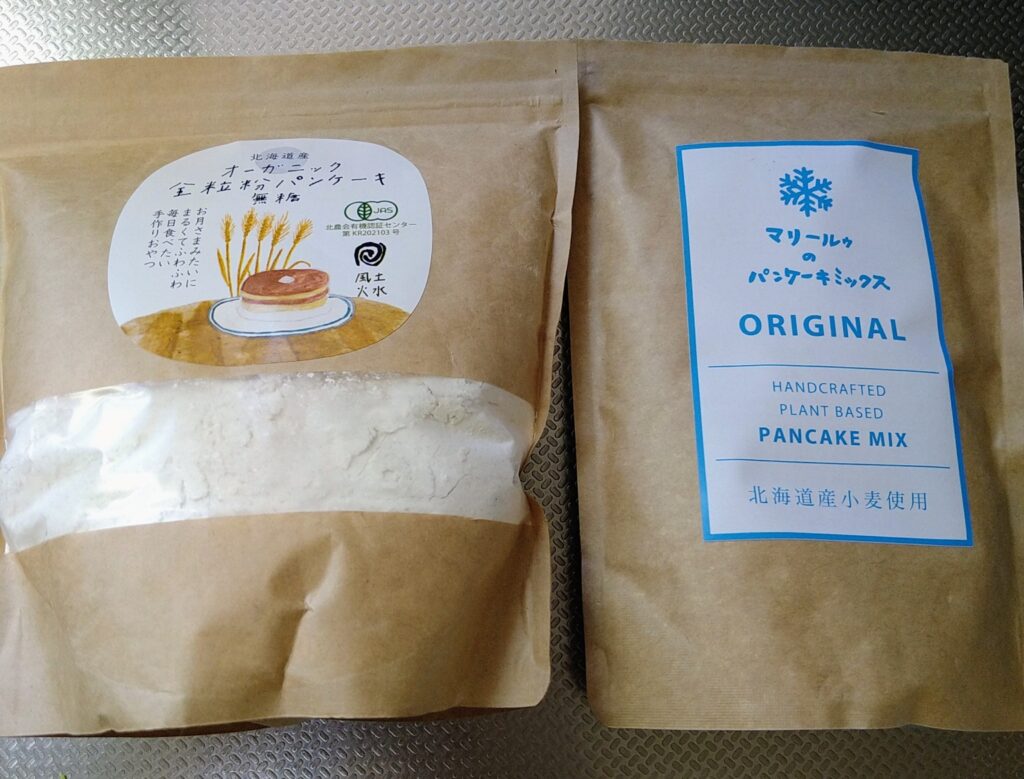
Follow the measurements on the package — they work as is.
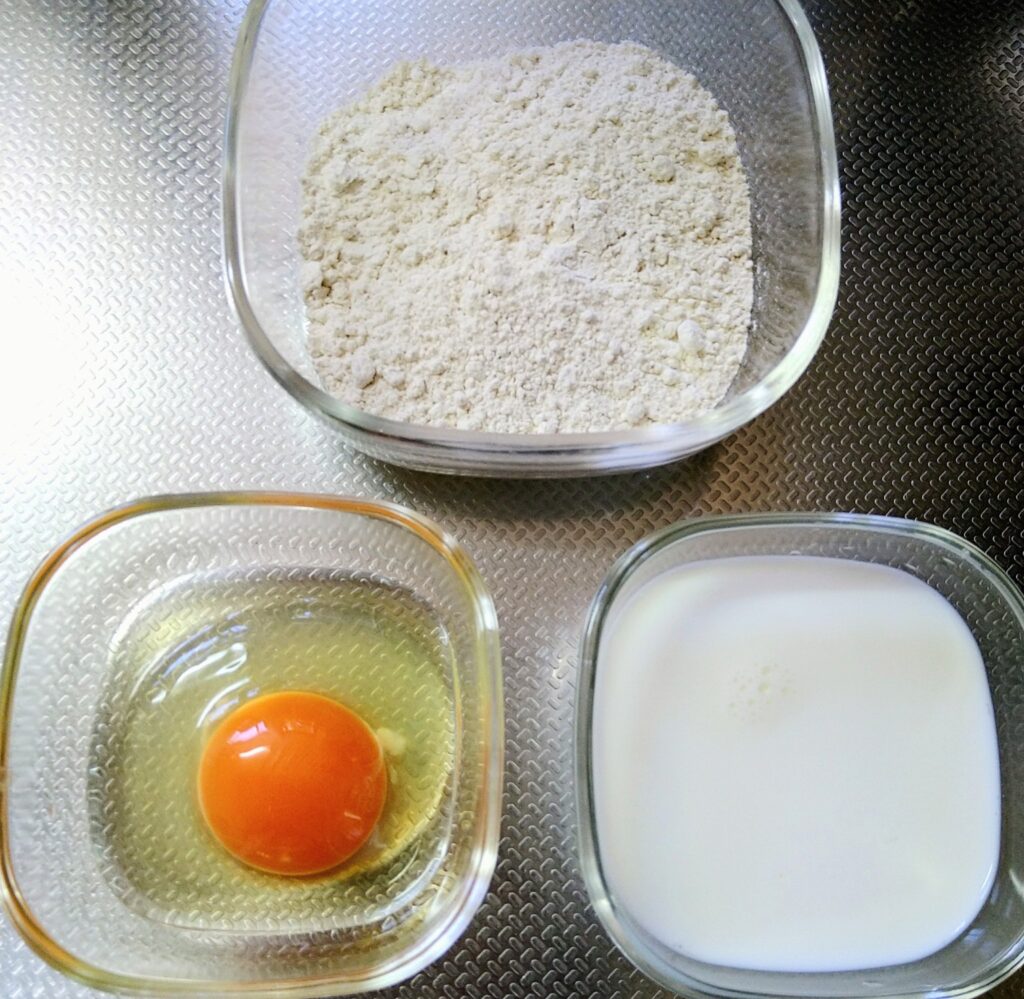
Mix the egg and milk together with a whisk first, then add the flour. When I added the flour to the milk first and mixed in the egg afterward, it didn’t combine evenly.
Cook on low heat. For thin pancakes, a lid is optional. For thicker ones, a lid helps prevent the center from being undercooked.
Eggs and Sugar — With or Without
I tested all four combinations: with and without eggs, with and without sugar. The difference in sticking was negligible.
Sugar makes things slightly more prone to burning.
Eggs make a difference in color. Without eggs, the pancakes come out pale. With eggs, the Maillard reaction gives them a nice golden color — if that matters to you, they’re worth adding.
How Much Milk
Adding more milk thins the batter, which spreads and makes a flatter pancake. It didn’t affect sticking, though.
Heat Control
The most important factor is heat control. Low and slow is the way to go.
I tried medium heat once to speed things up. It burned, and flipping early to avoid it left the center raw and the shape uneven.
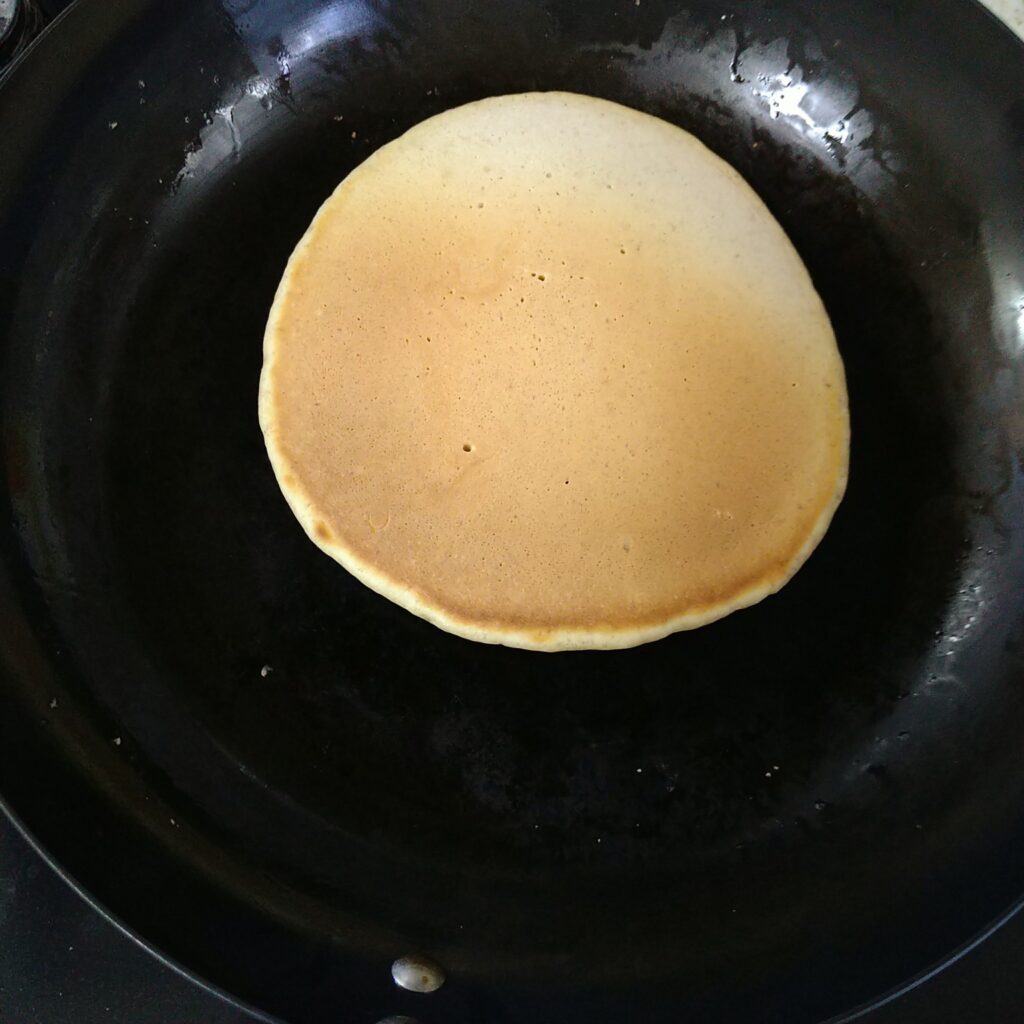
Wait until bubbles form across the surface and the edges look dry. Then flip. Not before.
On Preheating
The batter released cleanly even before full preheating
Cast iron usually needs a proper preheat, but pancakes were more forgiving. Unlike meat or eggs, starch gelatinizes under heat, and as the surface firms up, the adhesion weakens. The batter also sets as a single mass, so it lifts off cleanly even under pressure.
When the pan is properly preheated, briefly touching the bottom to a damp cloth just before adding the batter can help prevent burning — especially for the first pancake.
On Oil
I used half a tablespoon of oil at the start and didn’t add more. Everything cooked through without sticking. Whether that’s down to the properties of cast iron, the flour, or both — honestly, I’m not entirely sure.
One more thing: too much oil can apparently cause uneven browning. I did notice the second and third pancakes came out more evenly colored than the first.
Closing
Eggs, sugar, how much milk — none of it affected sticking. Pancakes turned out to be far more compatible with cast iron than I expected.
What you need to make pancakes in a cast iron pan is the right heat, and the patience to wait for it.
If patience isn’t your strong suit, eggs and a lid may help a little.
The first manga I ever bought was Yu Yu Hakusho — a 90s manga about a teenage delinquent turned spirit detective, fighting increasingly powerful demons.
Bear with me. I will explain cast iron cooking through Yu Yu Hakusho theory. If you get it, you get it. If you don’t — you might still learn something about cast iron.
I’d gotten pretty comfortable with cast iron. Eggs, meat, fish — nothing was sticking. I thought I had it figured out. Then I tried cooking carbs, and hit a wall. That’s when I realized: there’s a power hierarchy. And not all carbs are equal.
The Enemy Rankings
Cooking on cast iron requires a barrier — a protective layer between the food and the pan. In Yu Yu Hakusho, this is called a kekkai. You also need to know what you’re up against.
A weak kekkai is enough. Small fry. I debated D or C for pancakes. They behave like protein at first — sticking, then releasing as heat gets through. But they let go even with a weak kekkai. E rank stands. Disagreement noted.
D-Rank — High-starch vegetables
A basic kekkai handles it. Still small fry.
C-Rank — Protein (meat, eggs)
The kekkai takes care of them. They may stick at first, but once heat gets in, they naturally release. If they don’t, add a small splash of water or take the pan off the heat and wait.
B-Rank — Protein (fish) / Carbs (fried rice)
The kekkai mostly works, but fish skin can stick in spots. Fried rice held at B, but only with proper moisture control. Don’t get complacent.
A-Rank — Carbs (gyoza)
These break through the kekkai. They don’t release with time — they dig in deeper. Gyoza with soft, high-moisture wrappers are borderline S rank. The kekkai alone won’t save you. You need a Spirit Detective.
S-Rank — Carbs (???)
There’s always a higher rank. It’s out there, somewhere in the carb category. I just haven’t met it yet.
How Proteins and Carbs Behave Differently
Protein firms up as moisture evaporates, then releases. Wait long enough and it usually lets go on its own.
Carbs are different — or so I thought. After my early struggles with gyoza, I assumed all carbs were formidable enemies. But then fried rice came in at B-Rank, and pancakes at E-Rank. It turns out the real threat is more specific. Gyoza are the outlier. As they cook, the starch gelatinizes — absorbing moisture and forming a thin, glue-like layer that bonds to the pan surface. Waiting makes it worse.
How to Maintain the Kekkai — and Fight A-Rank Enemies
The foundation of cast iron cooking is the kekkai — keeping food from bonding directly to the metal. Preheating and oil are what create it. Against A-Rank enemies, you also need moisture management to maintain the kekkai, and the right tool to cut through what breaks past it — the Spirit Detective.
Preheat + Oil — The Kekkai
A properly heated pan sears the surface of food the moment it makes contact. Oil gets between the food and the metal, preventing direct contact. Together, these two create the kekkai. Without enough preheat, the surface bonds before it can sear. Too little oil, and the metal is exposed.
That said, the kekkai can be too strong. Push it too far and it damages the one casting it — in Yu Yu Hakusho terms, that’s Master Genkai herself. In my case, heating until smoke appears means olive oil fumes hit my throat. Pull back just before the smoke — when you see the faintest wisp, lower the heat. That’s the sweet spot.
Moisture Management — Maintaining the Kekkai
Excess moisture drops the pan temperature and weakens the kekkai. Keep the surface of your ingredients as dry as possible. Fried rice staying at B-Rank depends entirely on this.
The Right Tool — The Spirit Detective
If the kekkai and moisture management still aren’t enough, you need the right tool to cut through what gets past them.
Now, I thought I’d pulled off a near-perfect fusion of cast iron cooking and Yu Yu Hakusho — but once I finished writing, I noticed a fatal flaw. In the actual series, B and C-Rank demons can slip through barrier gaps, and anything D-Rank or below passes right through.
I thought about flipping it — putting vegetables at S-rank, protein at A-rank. But that felt completely wrong.
In the end, I couldn’t find a clean solution. The Yu Yu Hakusho theory of cast iron cooking remains unfinished. I’m sorry to anyone who read this far expecting a satisfying conclusion. But I intend to keep thinking about it.
Note: the stronger the demon energy, the more effective the kekkai.
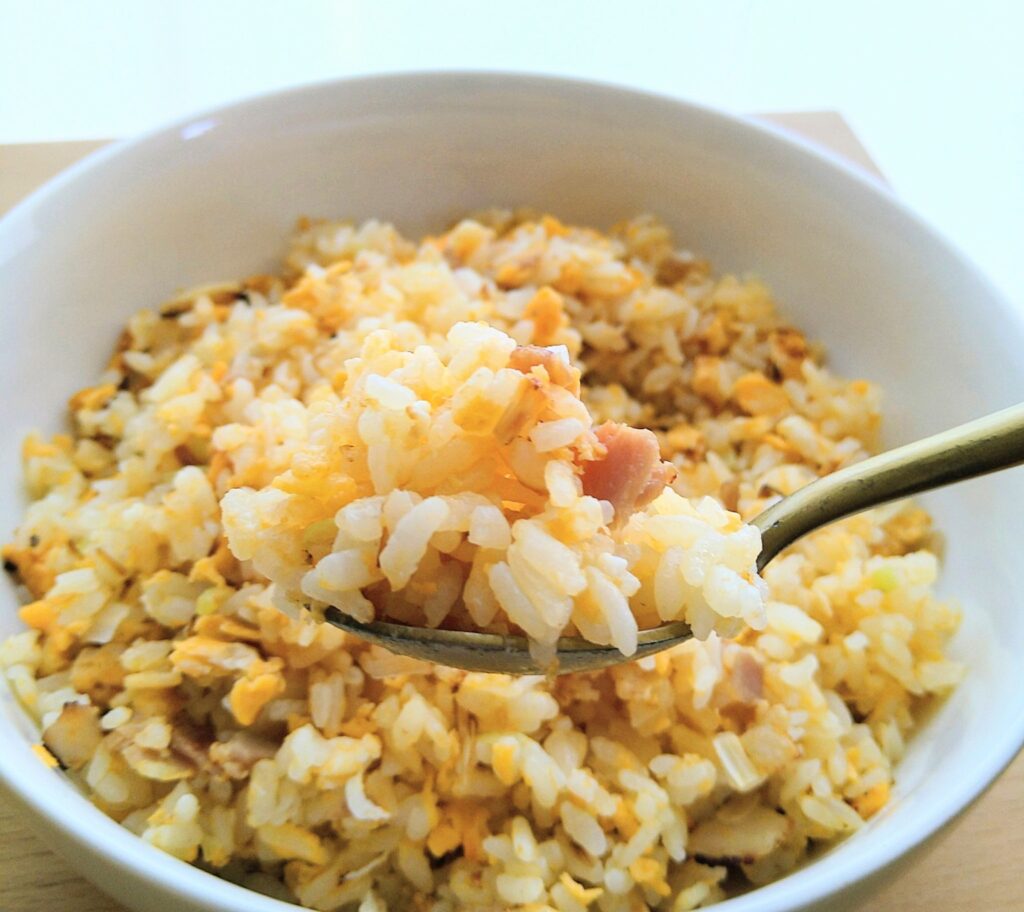
After all the trouble I went through with gyoza, I decided to try fried rice in the same iron pan.
The lessons I’d learned from gyoza were simple: preheat thoroughly, coat the surface with enough oil, manage moisture carefully, and use a thin stainless steel turner when it’s time to release. I figured the same principles should apply to fried rice.
Preparing the Rice — No Water, No Exceptions
Before I started, I came across an article claiming that rinsing cooked rice removes excess starch and makes it easier to fry up fluffy and separated.
But I had the gyoza incident fresh in my memory. I’d rinsed the wrappers under water, and they stuck completely — a disaster. That experience made one thing clear: getting the rice wet was not an option.
Instead, I left the freshly cooked rice to sit for about 30 minutes, letting the surface dry out slightly before using it.
How I Cooked It
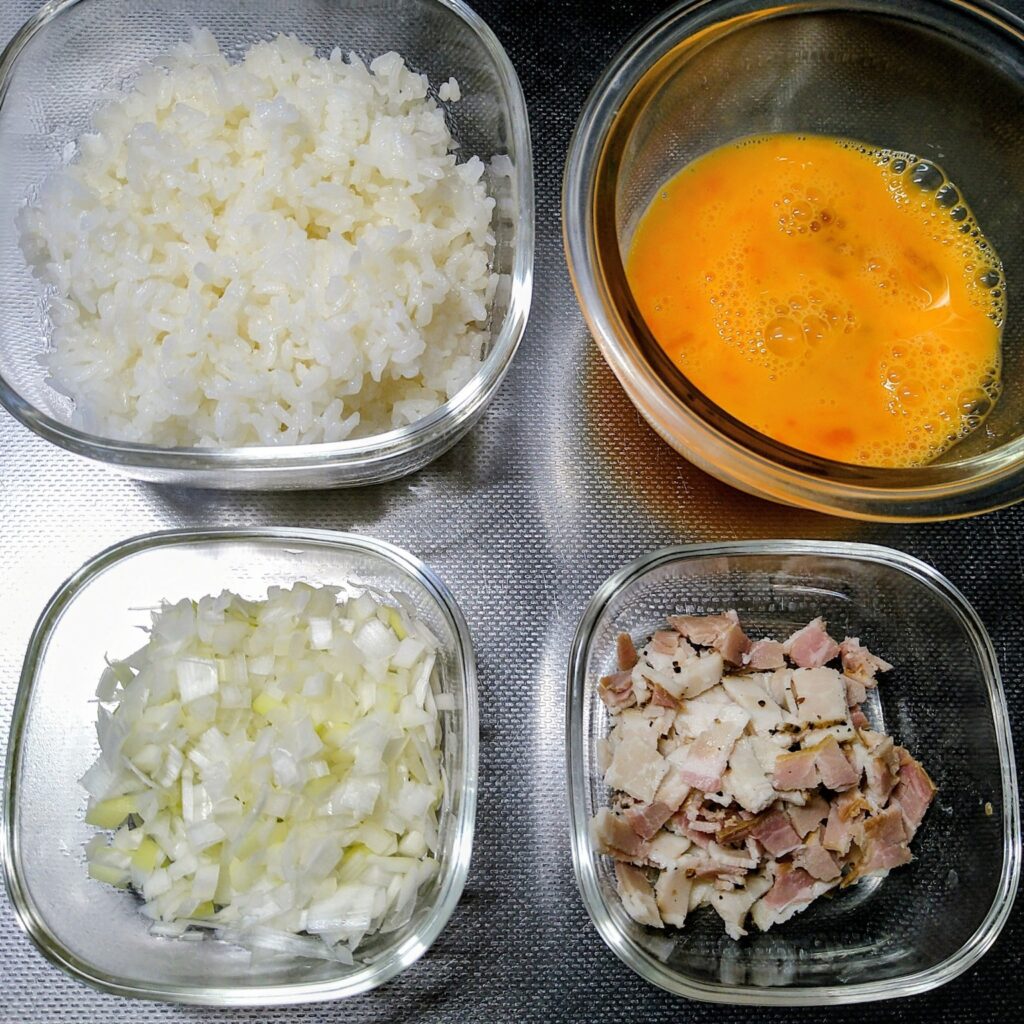
The ingredients were straightforward: green onion, bacon, two eggs, and rice.
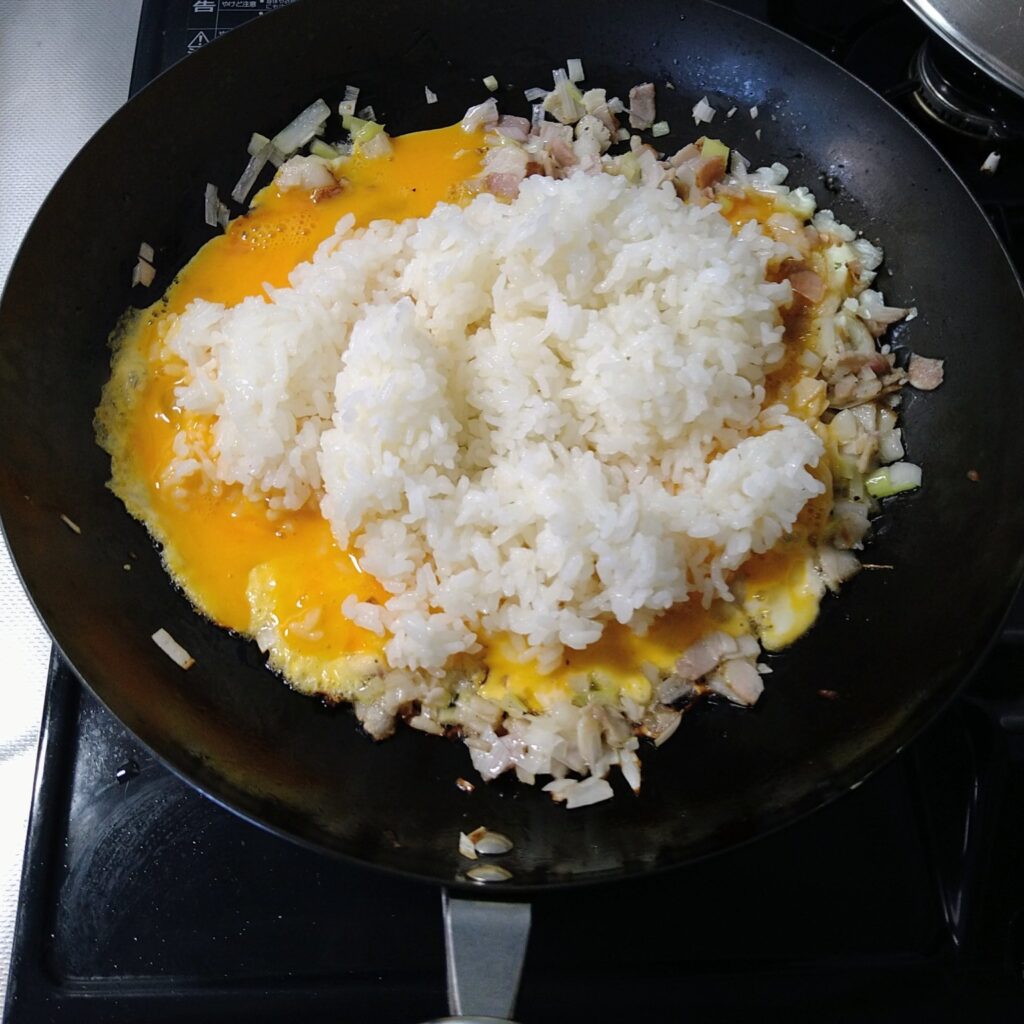
I preheated the pan thoroughly, then added about 3/4 tablespoon of oil. I stir-fried the green onion and bacon, then pushed them to the side. I added another 1/4 tablespoon of oil, poured in the beaten eggs, and placed the rice on top, breaking it apart as I went.
It stuck a little at first. But this time, I didn’t panic.
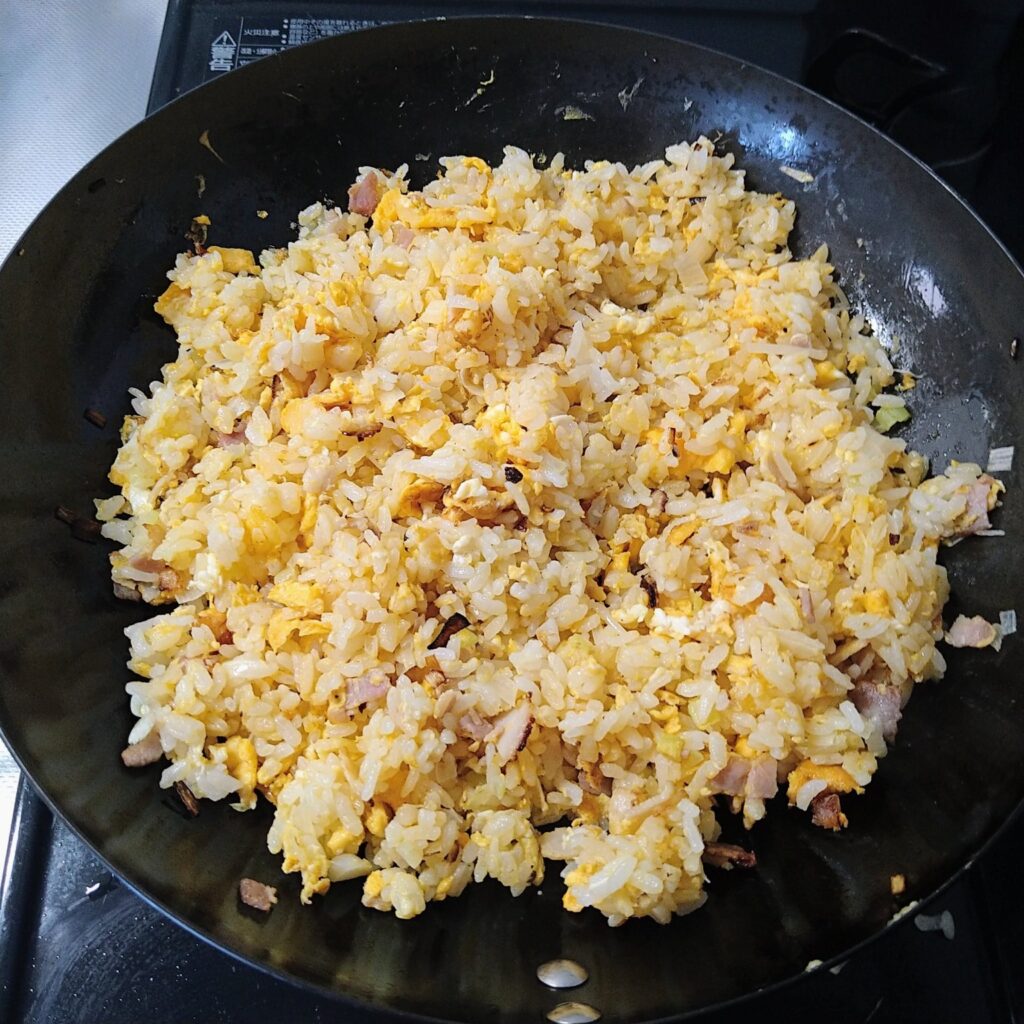
Unlike gyoza, the rice was coated in egg. I knew that protein contracts when heated and releases from the surface over time. I kept calm, sliding the stainless steel turner along the bottom to loosen things up — and gradually, the rice stopped sticking. By the end, I had fluffy, separated fried rice.
Why It Was Easier Than Gyoza
Gyoza wrappers are made of starch. The more moisture they get, the more firmly they bond to the pan. Even a small lapse in moisture management was enough to make them stick so hard that even a stainless steel turner couldn’t get under them.
Fried rice was different. Rice is starchy too, but the egg coating weakened the bond enough that even when it stuck, the turner could slide underneath without much force.
In the end, the lesson from gyoza — that starch-based foods come down to moisture management and the right tool — applied just as well here. The egg just made everything a little more forgiving.
One thing to fix next time: the green onion burned slightly. I’ll move the cooked ingredients to a plate before adding the egg and rice.
Final Thought
I’d bought extra ingredients expecting things to go wrong. They didn’t — it came out better than I expected on the first try, and the backup supplies went untouched.
They say a cast iron pan gets better with use. It seems I’m getting better too.
A while back, I wiped my iron pan with a tissue before cooking. It came out dark.
My first instinct was that something was wrong. But after looking into it, I found it was completely harmless.
What’s Actually on That Tissue
There are two main culprits.
The first is carbonized oil and food particles — residue that builds up on the surface with every cook. It sits on top of the pan, and it washes off.
The second is iron particles. These come from the surface of the pan being physically abraded. If you’ve been washing with something abrasive like a steel wool scrubber, that’s likely the cause. As the polymer layer develops, this tends to decrease over time.
I couldn’t tell which it was in my case, but once I started washing with a small amount of dish soap, the tissue stopped coming out black. That part of the mystery was solved.
But One Question Remained
When I started using dish soap, I worried I was stripping away the layer of oil I’d been building up over time. In practice, though, the pan’s performance barely changed.
Why? Because the black that remained on the pan’s surface was something else entirely — something that dish soap can’t touch.
What the Polymer Layer Actually Is
When an iron pan is used repeatedly at high heat, the oil undergoes a reaction called oxidative polymerization. The oil molecules bond together, forming a solid, stable layer on the surface. This is what’s commonly called seasoning — the same process that happens in cast iron skillets and woks.
This layer doesn’t wash off with a light scrub. As long as you’re not scrubbing aggressively or soaking the pan for extended periods, dish soap won’t break it down. That’s why changing how I washed the pan made almost no difference to how it cooked.
Why Iron Pans Develop a Polymer Layer — When Others Don’t
Pans with non-stick coatings or stainless steel don’t develop the same kind of layer. The reason comes down to the nature of iron as a material.
Iron has a porous, microscopically rough surface. Oil molecules can work their way in, and at high heat, oxidative polymerization causes them to bond and form a solid layer that actually stays put.
Non-stick coatings (like PTFE/Teflon) are chemically inert — nothing adheres to them, including oil. There’s no surface for a polymer layer to form on, and that’s by design. The whole point is that things don’t stick.
Stainless steel has a smoother, denser surface than iron. Oil doesn’t penetrate as easily, and while some polymerization can occur, it doesn’t build up into a stable layer the way it does with iron.
In short, iron pans are uniquely suited to developing seasoning because of their rough, oil-absorbing surface combined with the chemical reaction that heat makes possible.
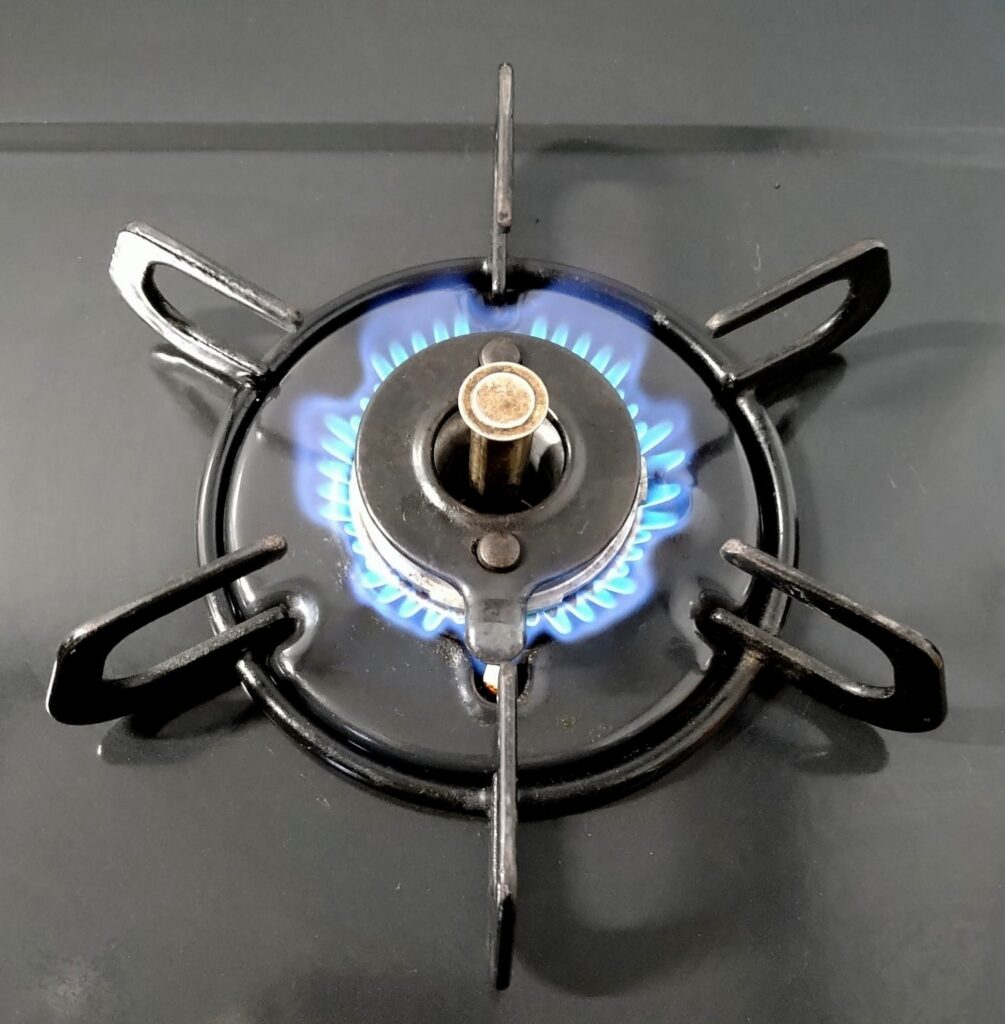
The Black Follows the Heat
The darkening isn’t uniform. Looking at the bottom of my pan, the black appears not in the center, but in a ring — a donut shape. That’s because gas burners release flame in a ring, so the heat concentrates where the flame actually touches. Polymerization accelerates at higher temperatures, so the layer builds there first.
In other words, the black on your pan is a heat map.
With regular use, the seasoning gradually spreads outward from there.
Telling the Difference from Rust
The polymer layer and rust can be distinguished by how they look and feel.
Polymer layer
Appearance
Even black to dark brown
Texture
Smooth, matte
Rust
Appearance
Reddish-brown, patchy
Texture
Rough, flaky
As the polymer layer develops, it fills in the microscopic gaps on the surface, leaving less room for rust to take hold. If rust does appear, it’s usually a sign that the layer is still thin — or has been damaged.
Final Thought
I’ve never done any kind of deliberate seasoning — no oven treatments, no multiple rounds of heating oil. I’ve just been cooking with it regularly, using a small amount of oil each time, and washing it simply when needed.
And yet, the pan has gradually darkened and performs better than when it was new. I’m curious to see where it goes from here.
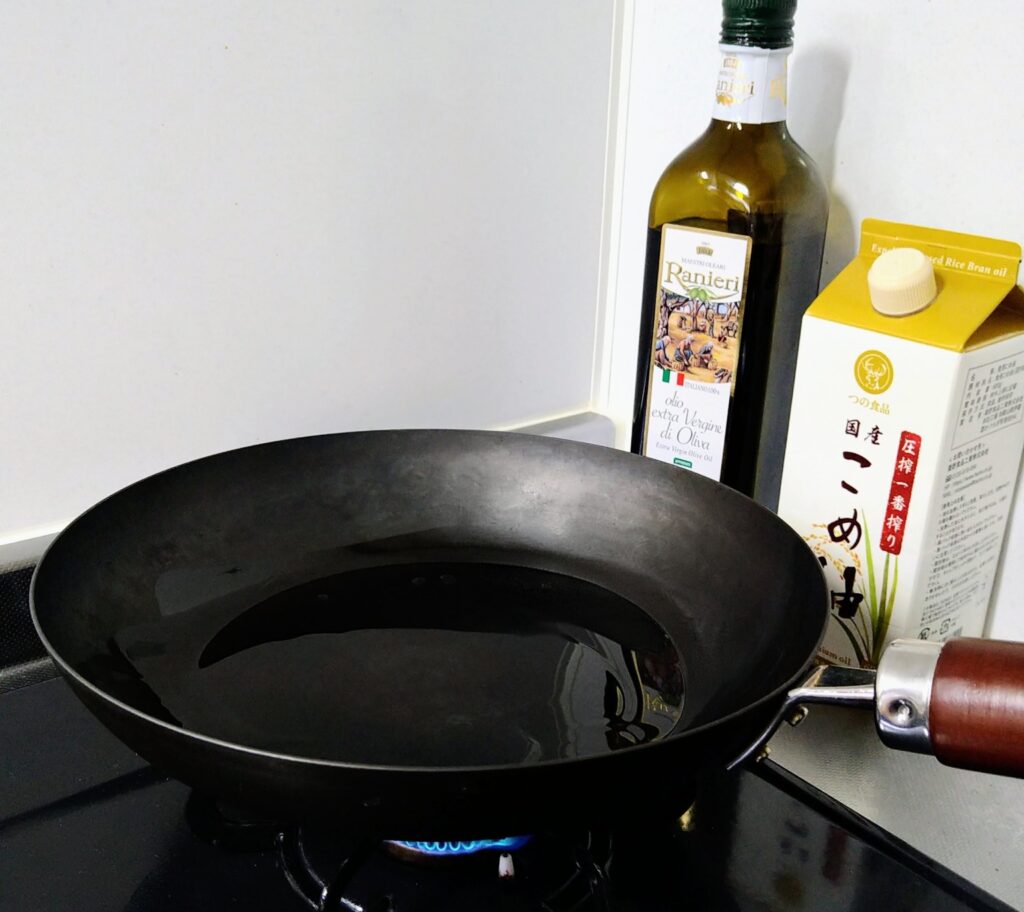
For a while, I’d noticed that heating olive oil at high temperatures left my throat feeling irritated afterward.
I searched “cast iron pan throat pain” but couldn’t find anything relevant. I assumed it was just my imagination and let it go. But the feeling kept coming back, so I decided to look into it properly.
It wasn’t my imagination.
The Culprit: Acrolein
Every oil has a smoke point — the temperature at which it starts to break down and produce visible smoke. When oil exceeds its smoke point, it undergoes chemical decomposition and produces a compound called acrolein. Acrolein forms with any oil, but oils with a lower smoke point reach that threshold faster.
Acrolein is a strong irritant to the mucous membranes of the eyes, nose, and throat. The irritation I’d been feeling was most likely from inhaling it.
Why Olive Oil Is Especially Prone to This
Smoke points vary significantly depending on the type of oil.
Oil
Smoke Point
Butter
~150°C
Extra virgin olive oil
~160–190°C
Grapeseed oil
~215°C
Canola oil
~200–230°C
Sunflower oil
~230°C
Rice bran oil
~230°C
Ghee
~250°C
Avocado oil
~270°C
Extra virgin olive oil has one of the lowest smoke points on the list — around 160–190°C. It reaches its threshold faster than most other oils.
I had been using extra virgin olive oil. And I had a habit of preheating my cast iron pan until it just started to smoke. That means I was regularly heating the oil past its smoke point. The conditions for acrolein production were there every time.
Refined olive oil has a higher smoke point of around 240°C, so the same cooking style would produce less irritation. That said, extra virgin retains more flavor and health benefits. It may be worth using different oils for different purposes.
Oils That Work Better with Cast Iron
Cast iron pans are often used at high heat, so oils with a higher smoke point tend to work better. Based on the table above, rice bran oil, sunflower oil, canola oil, and avocado oil are all solid options.
Rice bran oil A staple in Asian cooking, long used in cast iron pans and woks. Neutral in flavor, so it won’t affect the taste of your food. A practical choice for everyday use.
Avocado oil One of the highest smoke points available. Mild flavor and easy to use — though it tends to be more expensive.
Canola oil / Sunflower oil Widely available and affordable. Neutral flavor and high smoke point make them reliable for everyday cooking.
Extra virgin olive oil Rich in flavor and health benefits, but not well suited for high-heat cast iron cooking. Better saved for low-heat finishing or uncooked uses like dressings.
Final Thoughts
I’d read that heating a cast iron pan until it smokes was the right way to preheat it. With no PTFE coating to worry about, high heat seemed like a non-issue. And the pan itself was fine. But I didn’t realize that the oil you use can turn that into a problem.
Now I use rice bran oil for cast iron cooking and save the extra virgin olive oil for dishes that don’t involve high heat.
I also stop preheating before the smoke appears. If I see the faintest wisp, I lower the heat right away to keep the pan from getting hotter than it needs to be.
I’m glad I didn’t just ignore the feeling. If you’ve noticed something similar, it might be worth checking the smoke point of the oil you’ve been using.
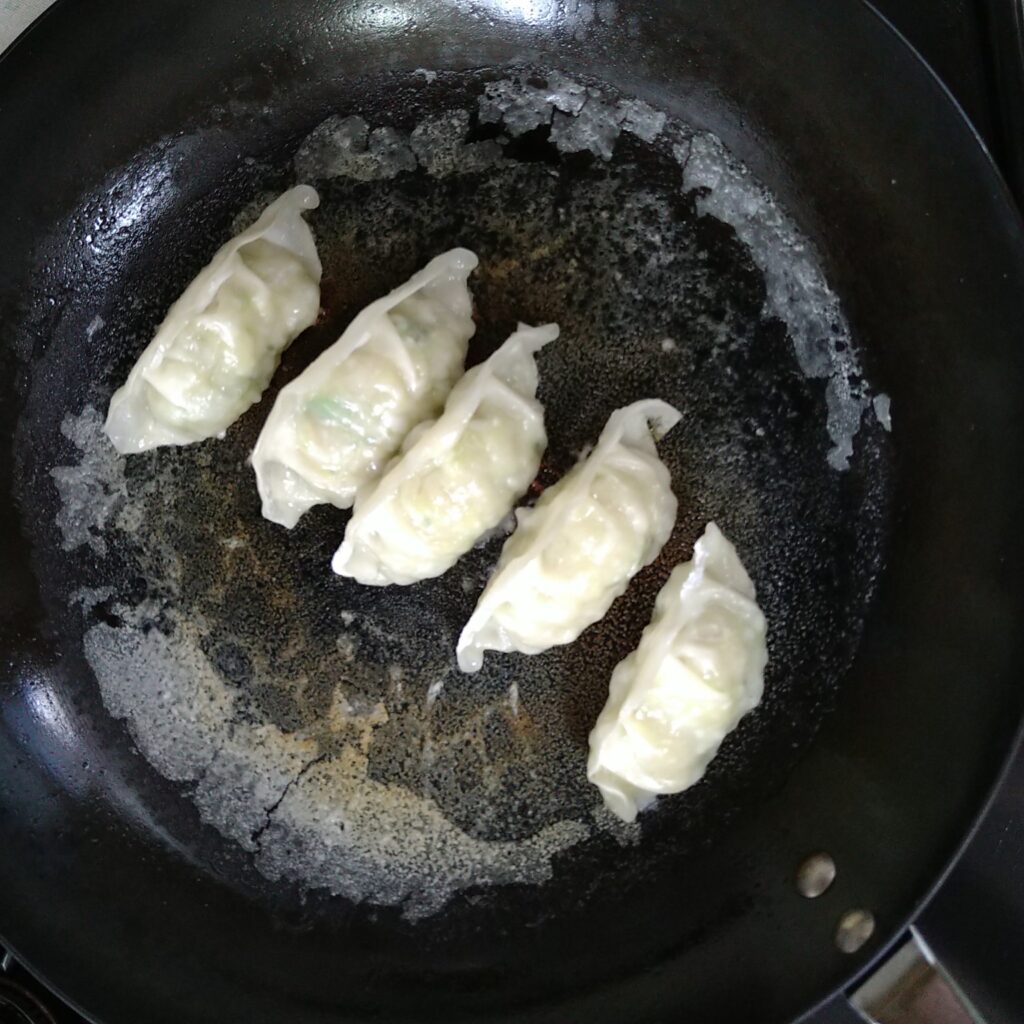
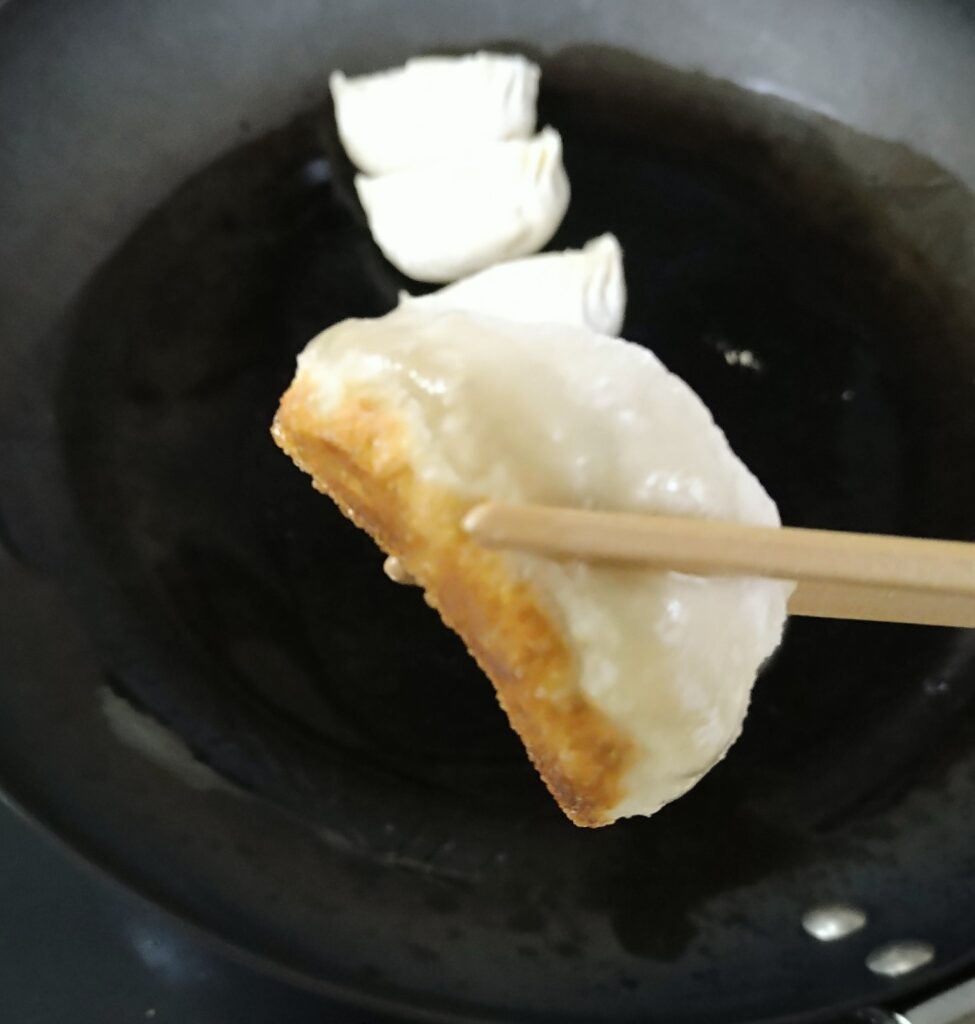
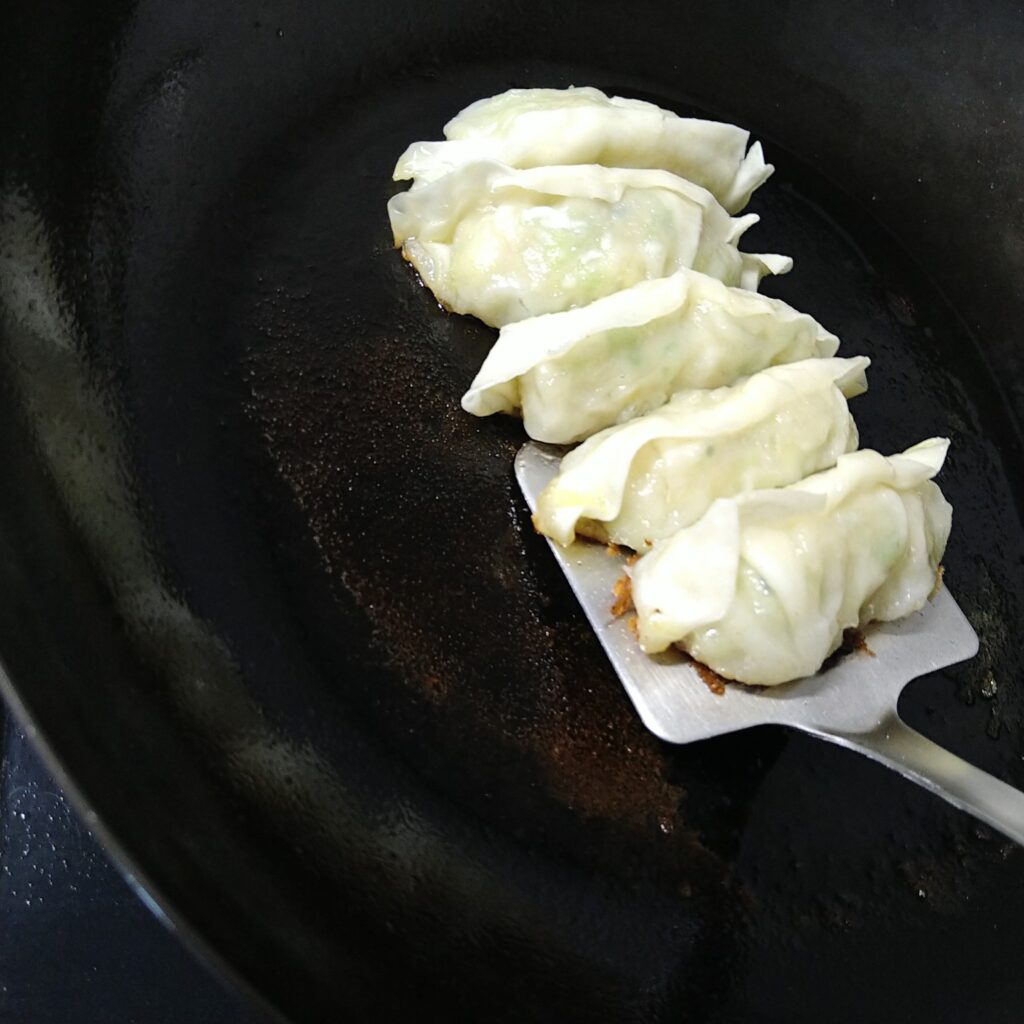
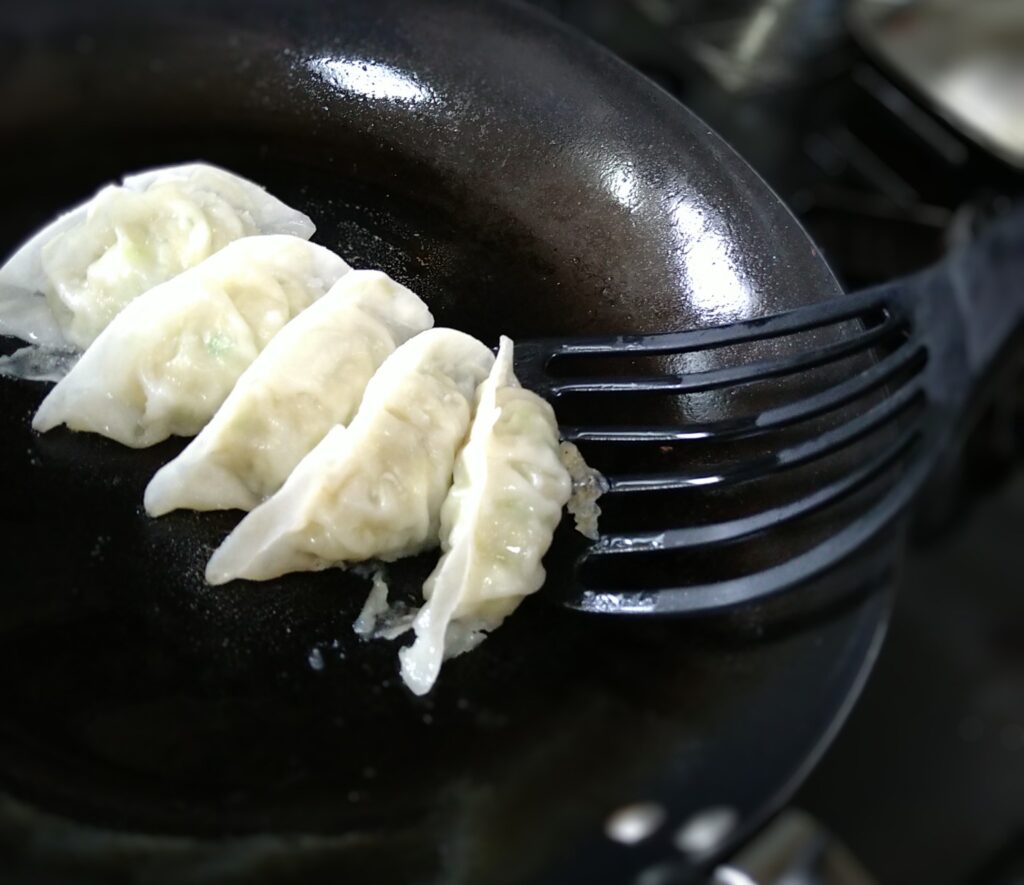
Before adding water for steaming, the gyoza release cleanly from the pan and are not sticking yet.
I was comfortable cooking protein in my cast iron pan. So I assumed gyoza would be no different.
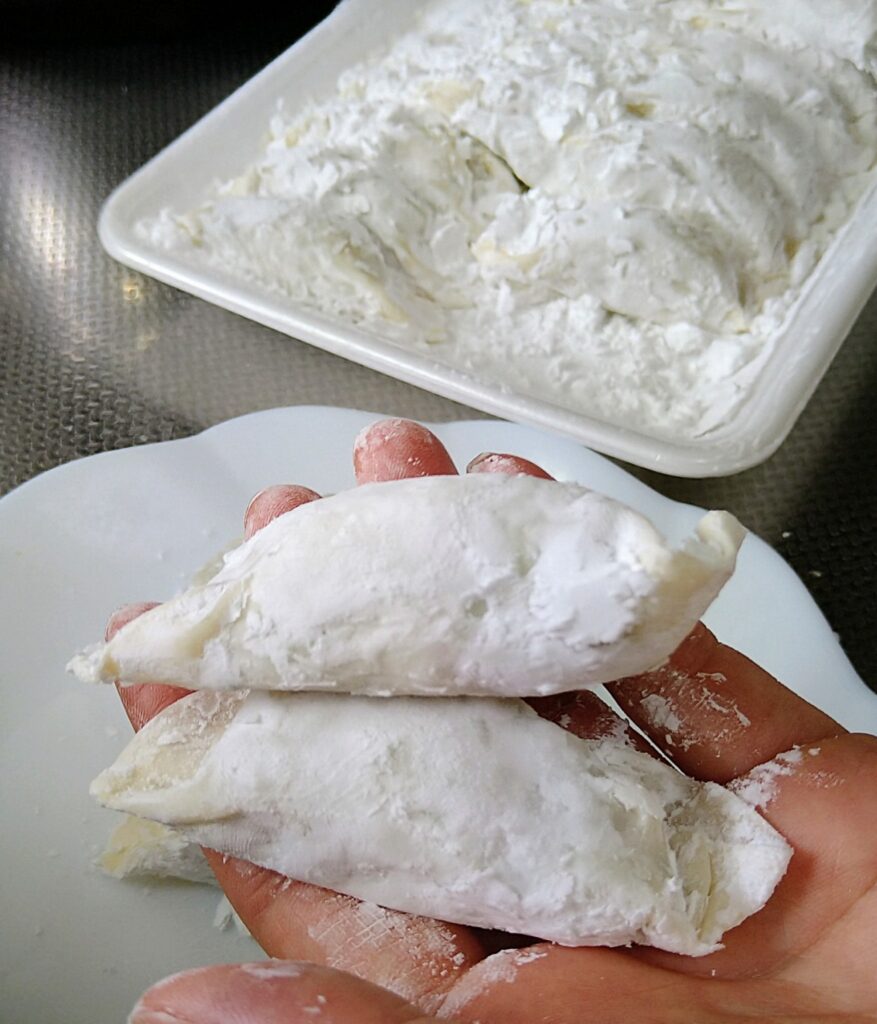
I thawed some frozen dumplings and rinsed the wrappers under water to remove the excess flour. They stuck completely.
After cooking 70 more gyoza, I figured out what went wrong. There are four things that matter when cooking gyoza in a cast iron pan — heat, oil, moisture management, and the right tool.
The Four Key Points
The foundation of cast iron cooking is a shield — creating a state where food doesn’t directly bond to the metal surface. Heat and oil work together to create it.
For gyoza, two more factors come into play: moisture management to maintain the shield, and the right tool to act as a spear and break the bond when it’s time to release.
Heat + Oil — The Shield
A properly preheated pan instantly sears and sets the surface of the food the moment it makes contact. Oil gets between the food and the pan, preventing direct contact. Together, these two create the shield.
Without enough heat, the wrapper bonds to the pan before the surface has a chance to set. Too little oil exposes the metal surface and makes sticking more likely.
Moisture Management — Maintaining the Shield
Too much moisture lowers the pan’s temperature and weakens the shield. Use wrappers that are dry. After steaming, remove the lid and let the moisture evaporate completely.
The Tool — The Spear
The turner’s job is to slide its edge under the wrapper and break the bond between the gyoza and the pan. The thinner and harder the edge, the less force it takes to get under.
Silicone flexes and lacks a sharp edge. Wood is hard but thick and dull. Both fail to cut through the bond. The only tool that can is a thin, rigid stainless steel turner.
Why Gyoza Sticks to a Cast Iron Pan
Gyoza wrappers are made from wheat flour. When exposed to heat and moisture, the starch gelatinizes and bonds to the surface of the pan. Unlike protein, which contracts when heated and releases from the pan, starch does the opposite — the more heat and moisture it gets, the more it sticks.
In practice, the gyoza didn’t stick before the steaming water was added. The moment moisture entered the pan, they started to bond. That explains the first failure. Rinsing the wrappers added excess moisture before cooking even started.
Gyoza Is Meant to Stick — and Then Be Released
The crispy texture of pan-fried gyoza comes from gelatinized starch. As the gelatinized starch loses moisture and sets, it creates that signature crunch. Sticking, in other words, isn’t the problem. It’s what makes gyoza crispy.
What matters is the quality of the bond.
When the shield is working and gelatinization begins after the steaming water is added, there’s already a seared layer between the wrapper and the pan. The bond stays on the surface. Once the moisture evaporates, the gyoza can be released with a turner.
When the wrapper is wet from the start, the shield weakens. The starch bonds directly to the metal surface. By the time it sets, the bond is too strong for even a stainless steel turner to break.
This is what seems to be happening — though it’s hard to say for certain.
Wrapper Texture Changes Everything
I tested two types of gyoza — fresh and frozen — and the results were the same either way. What mattered wasn’t fresh versus frozen. It was the wrapper.
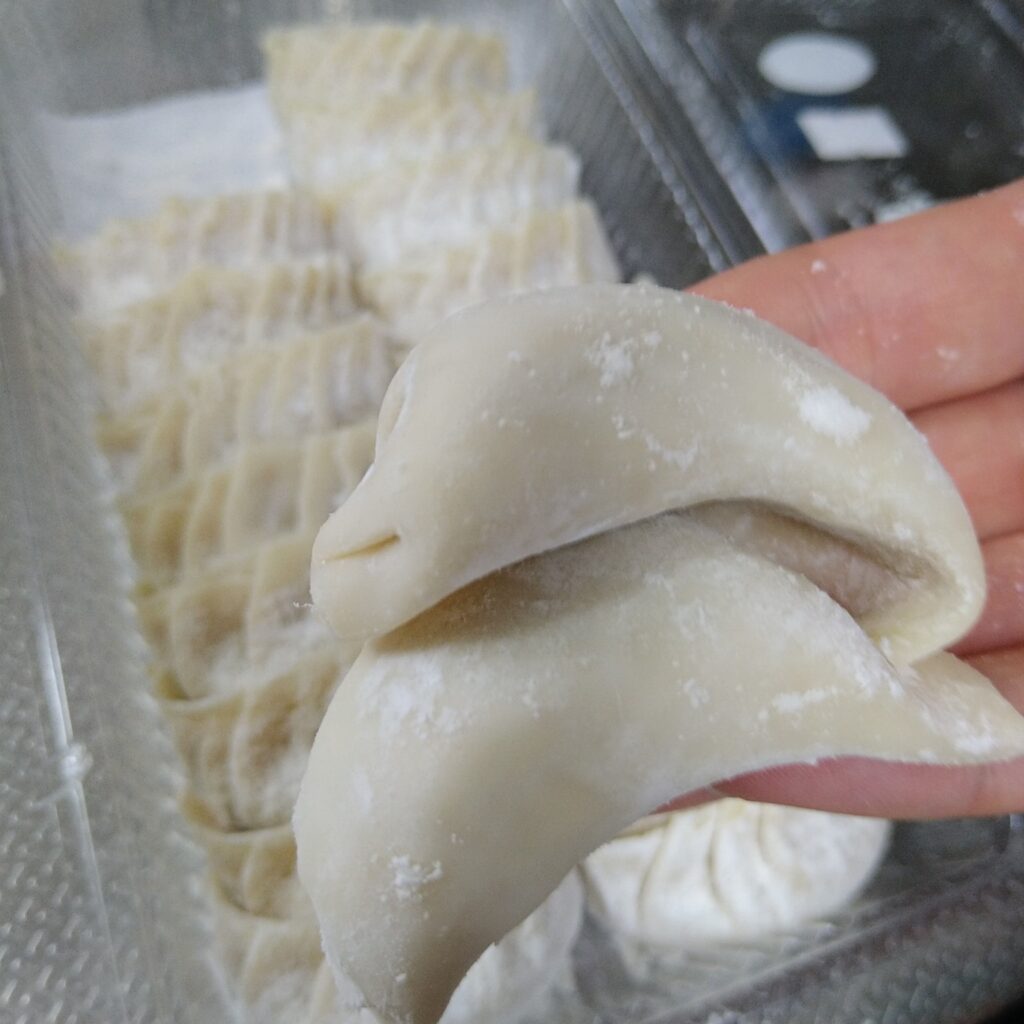
Gyoza with firm, low-moisture wrappers were straightforward. Even if they stuck a little, a gentle push with a silicone turner was enough to release them. The wrappers stayed intact. Clean results.
Firmer, lower-moisture wrappers hold much less excess flour.
Gyoza with soft, high-moisture wrappers were a different story. They stuck more, the edges would release but the center stayed bonded, and the act of releasing them was itself enough to tear the skin.
Soft, high-moisture wrappers tend to hold onto excess flour.
The wrappers tend to tear in the center where moisture is highest.
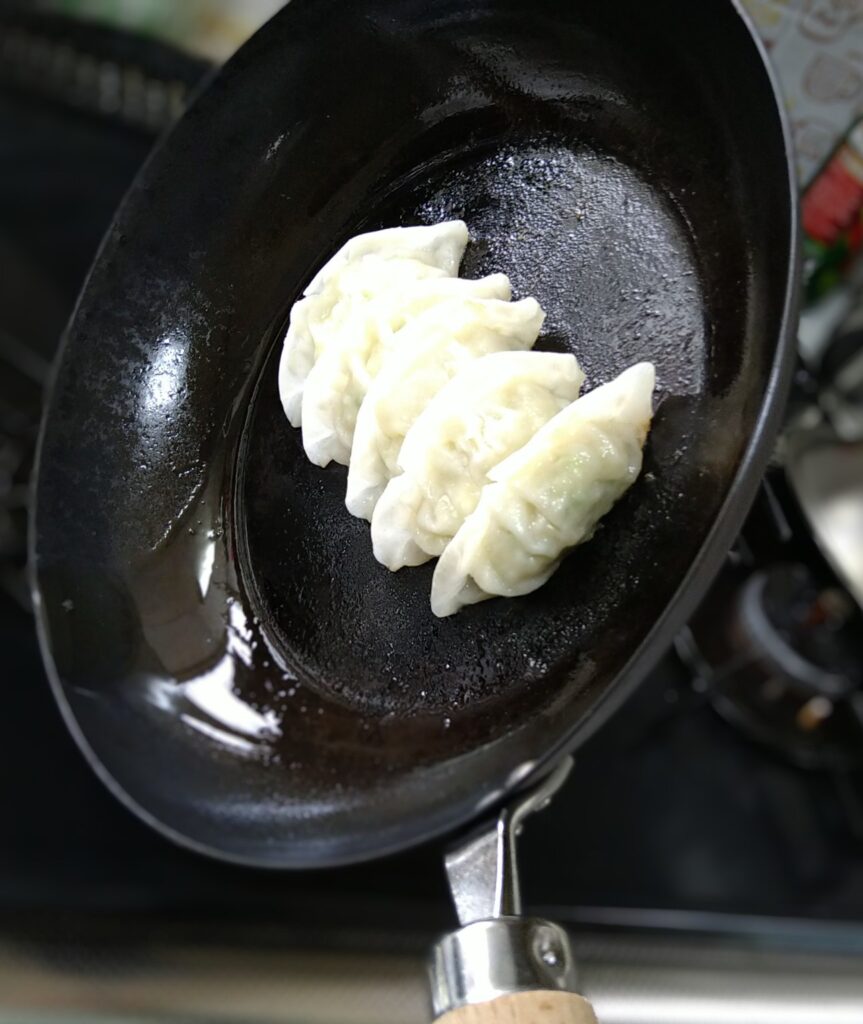
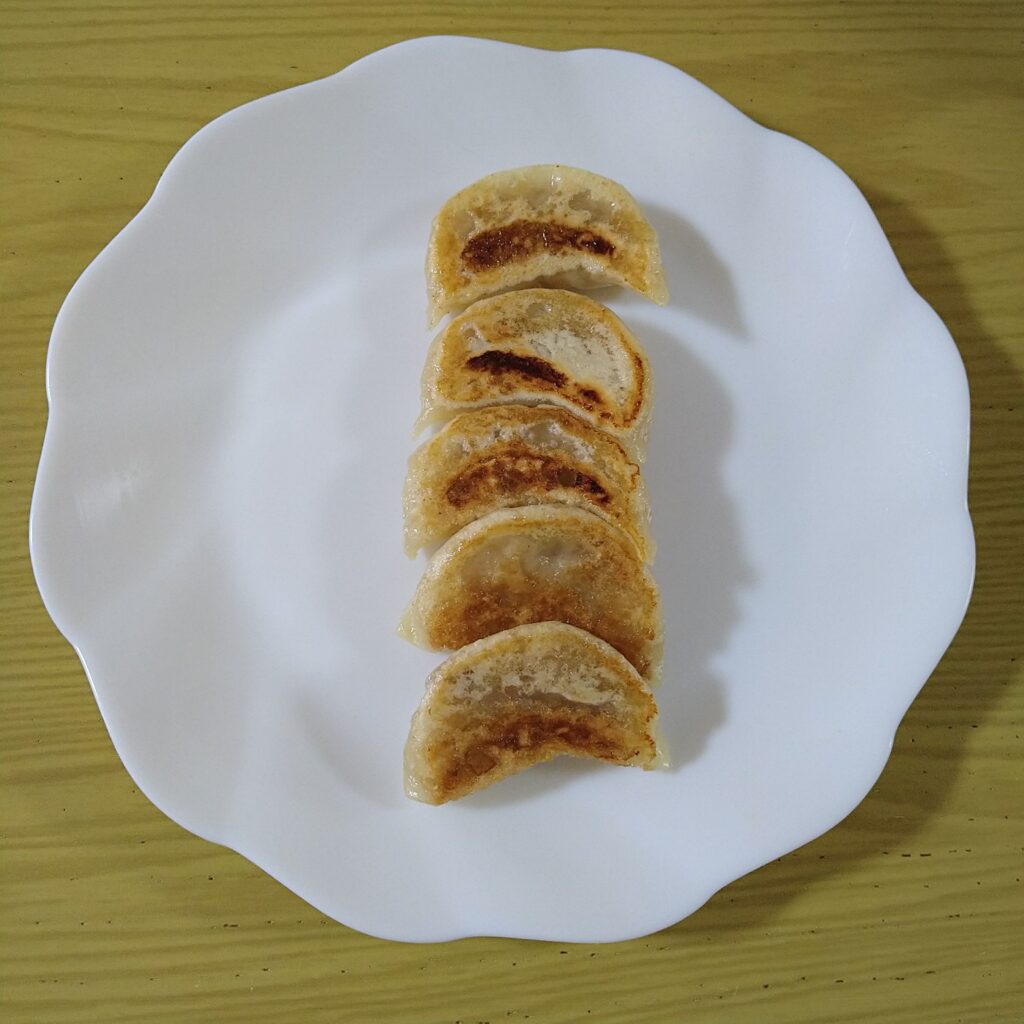
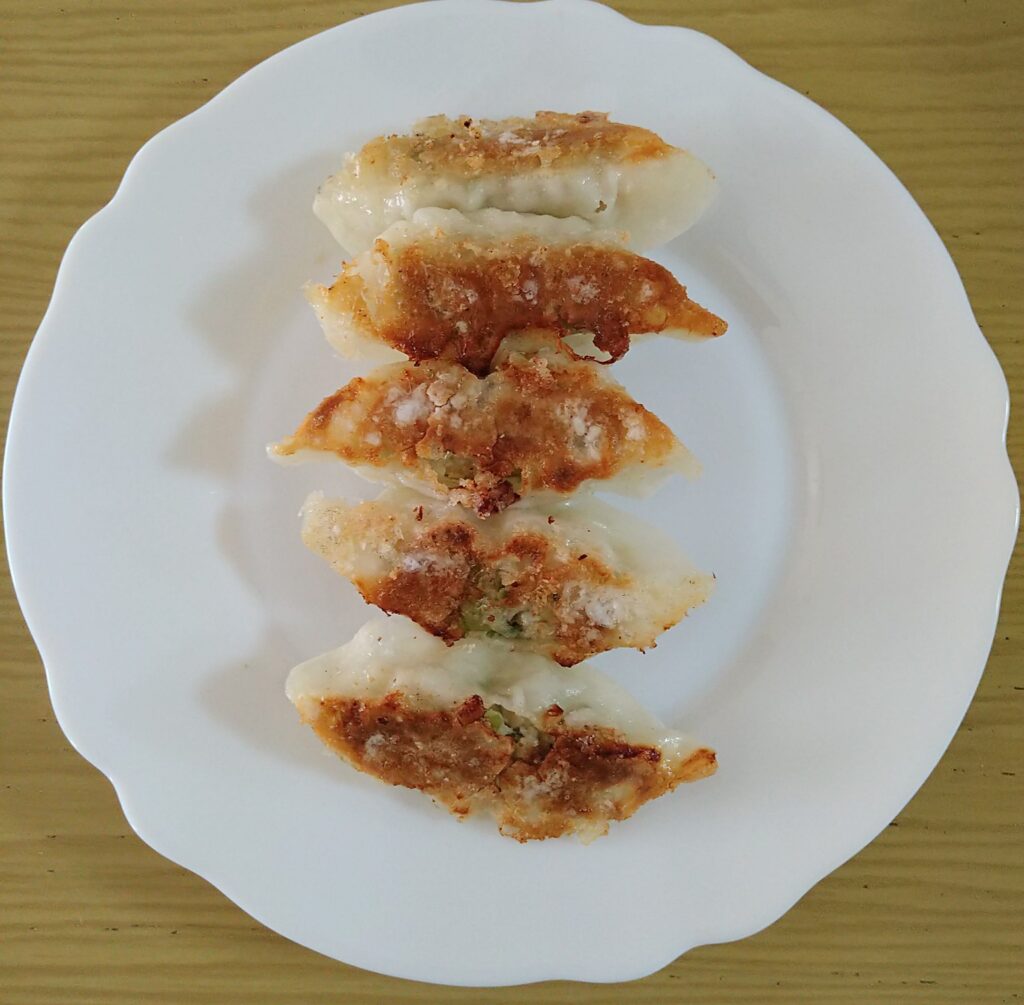
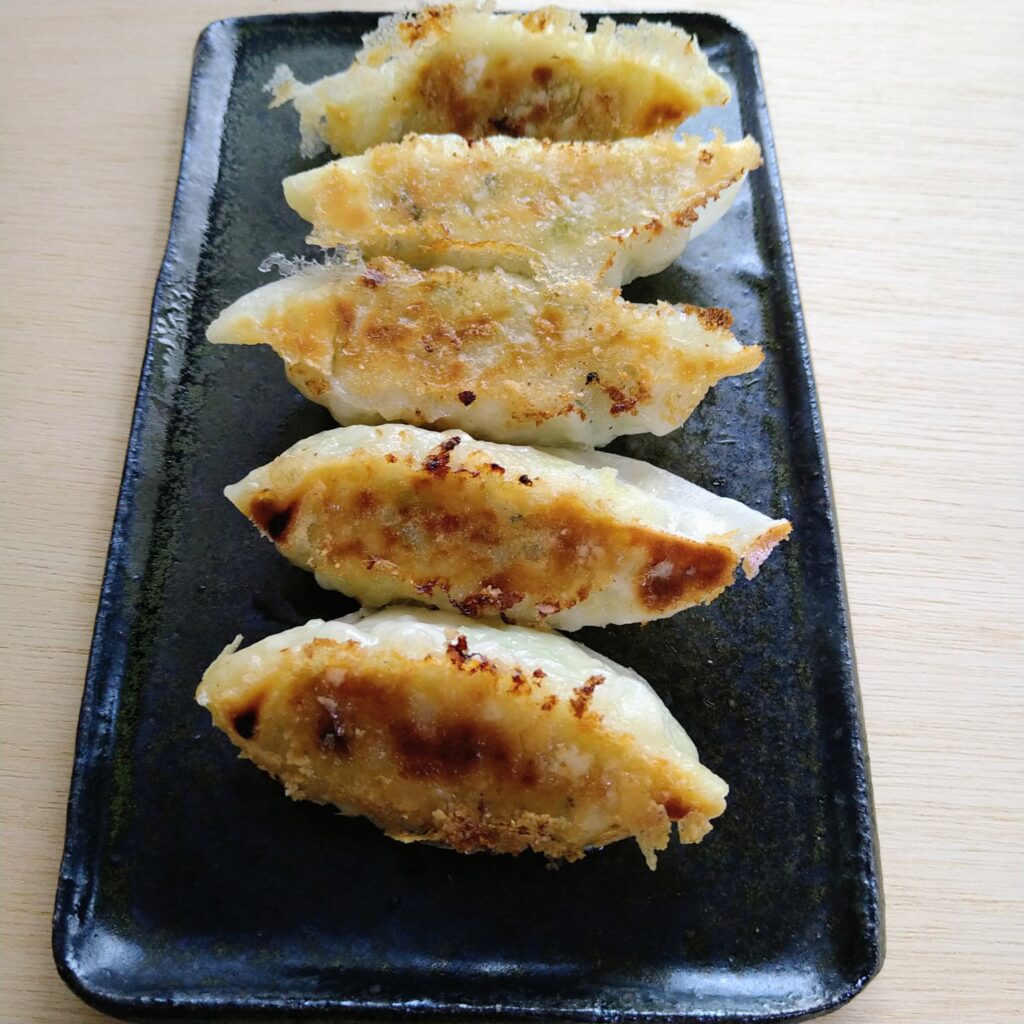
Nicely browned, but three wrappers tore.
A silicone turner couldn’t get under the wrapper or the crispy edges. I tried more oil. I tried hot water instead of cold for steaming. Nothing changed. Even with heat, oil, and moisture well managed, the final act of releasing the gyoza was the hardest part. That’s where the tool makes the difference.
A stainless steel turner could slide under where silicone couldn’t. With force concentrated at the edge and minimal resistance, it got under the wrapper without tearing it. The moment I switched turners, the struggle was over.
A thin stainless steel turner can slide under the wrapper and break the bond with the pan.
A flexible silicone turner bends easily and cannot break the bond between the gyoza and the pan.
How to Cook Gyoza
Preheat the pan
Heat over medium until just before it starts to smoke. If you see a faint wisp of smoke, lower the heat slightly.
Add oil
Swirl to coat the entire surface, with just a little left over. For a 26cm pan, about 1/2 to 1 tablespoon. When the pan is properly preheated, the oil will spread quickly and smoothly. As the pan becomes more seasoned over time, less oil will be needed.
Add the gyoza
Place them flat side down. Cook until the bottoms are lightly golden. Lower the heat slightly here to avoid burning while the first pieces are still going in.
Add water
Pour in enough to reach about 1/4 to 1/3 of the height of the gyoza. For crispy wings, mix in a little potato starch or flour.
Cover and steam
Cover with a lid and steam until most of the water has evaporated.
Remove the lid and dry the pan
When you hear a crackling, sizzling sound, remove the lid and let the remaining moisture evaporate completely. Cook until the wings and edges of the gyoza are golden. Adding a small drizzle of oil at this stage seems to make them crispier, though it’s not necessary. Medium to low heat is safer here — high heat makes it easy to burn.
Release and plate
Slide the turner under the wrapper and crispy edges, and release the gyoza carefully.
No tearing with soft, high-moisture wrappers.
Final Thoughts
At first, I was looking for a way to cook gyoza without it sticking. Maybe a professional cook could pull that off. But for an amateur like me, it wasn’t happening.
So I changed my approach. I accepted that gyoza is a food that sticks — and focused on keeping the bond as weak as possible through heat, oil, and moisture management, then relied on the right tool to finish the job.
The moment I switched to a stainless steel turner, the gyoza that had given me so much trouble came off the pan cleanly. It might not be the perfect method. But for me, it was enough.
Gyoza cooked in cast iron has a flavor and crispiness that other pans can’t quite match. I think it’s worth the effort.